使用UIToolKit制作面板
使用UIToolKit制作面板
使用UIToolKit制作面板
00 制作Editor面板
00.0 点击生成按钮
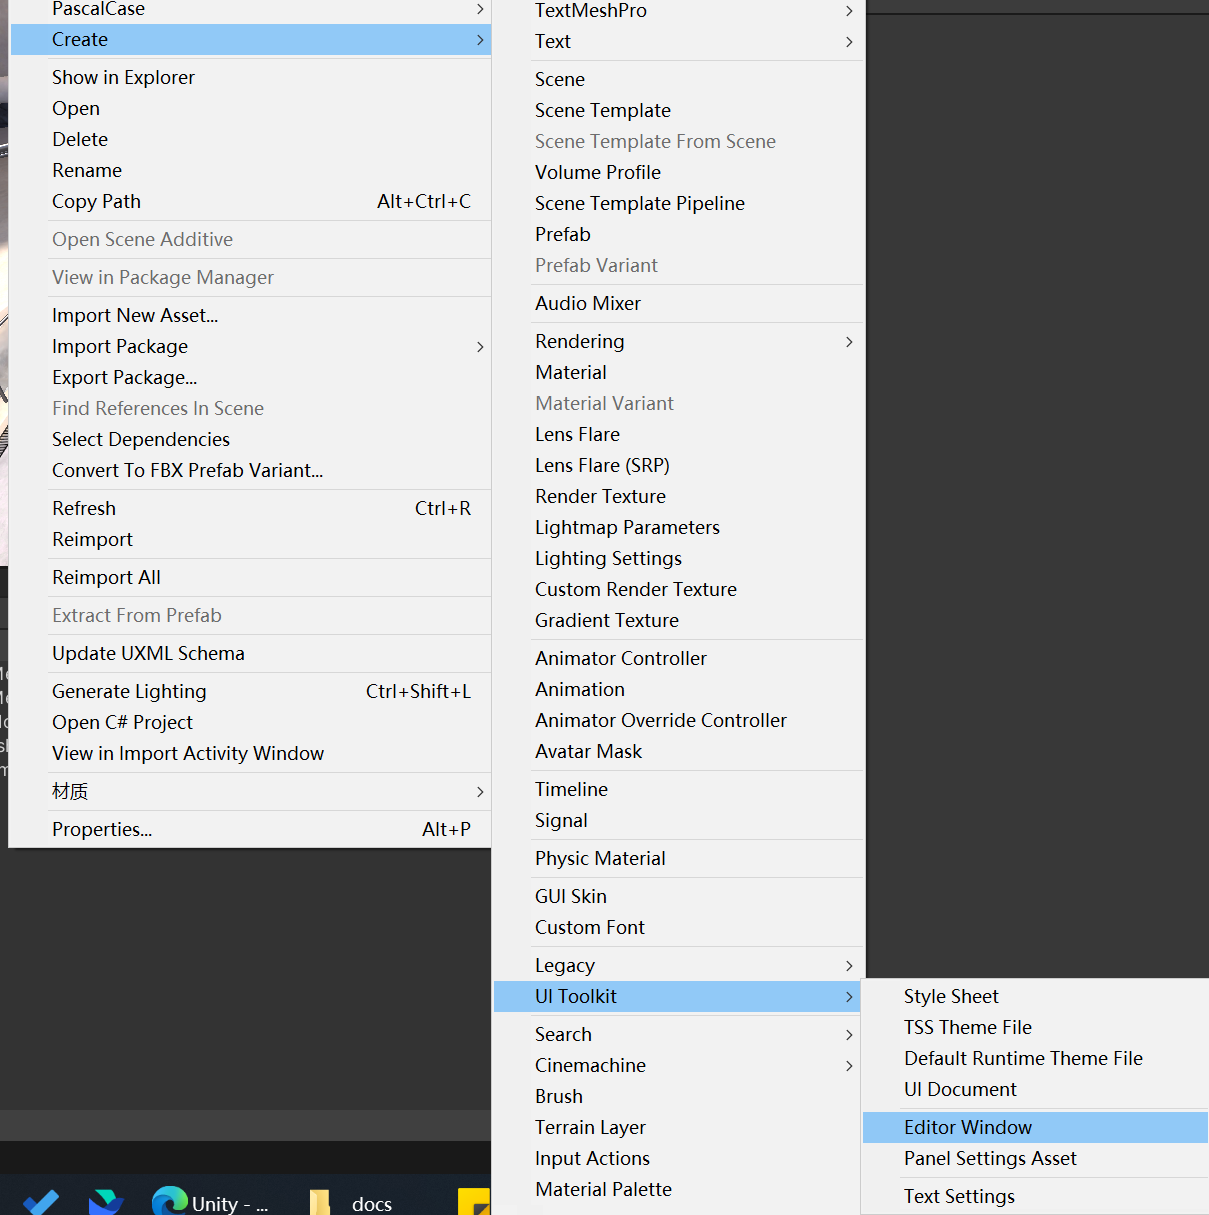
在Project面板中右键菜单选择Create->UI Toolkit->Editor Window
00.1 选择模板文件
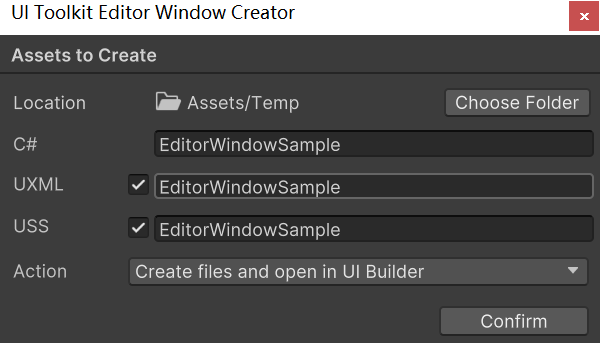
输入名称后, 其中UXML和USS是EditorWindow的布局和样式文件, Action可以选择只创建文件或者创建并在UIBuilder中打开, UXML和USS文件不是必须, 熟练之后后续可以不创建或者删除.
00.2 UI Builder必要的设置
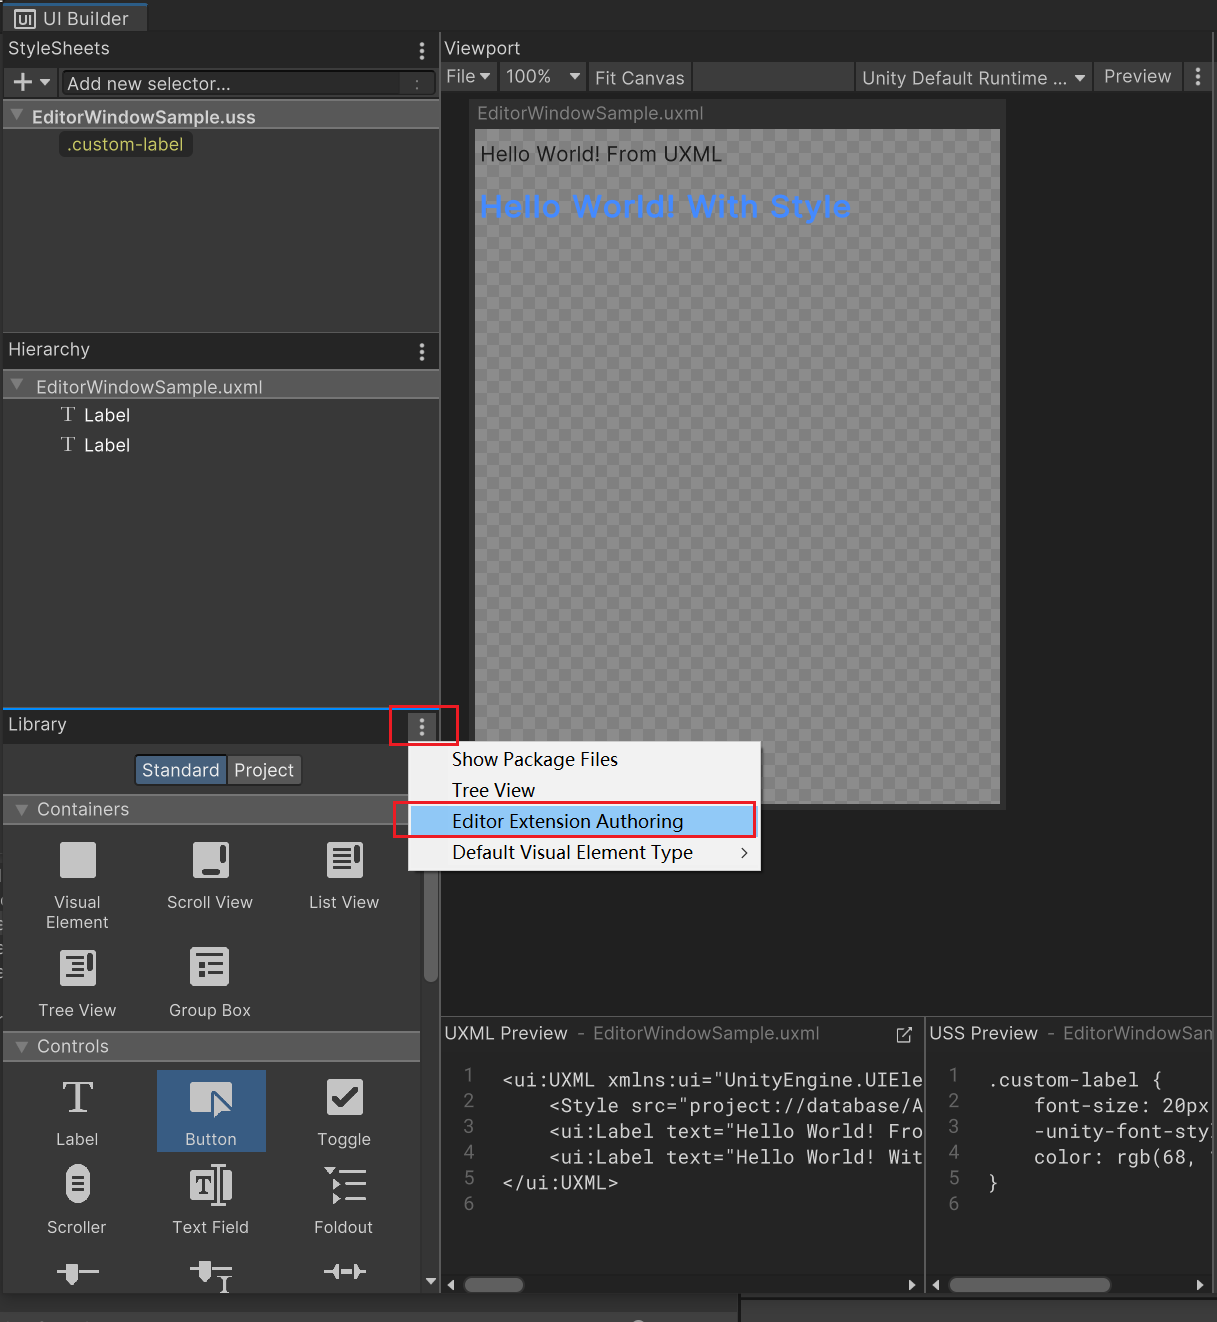
开启编辑器专用的组件
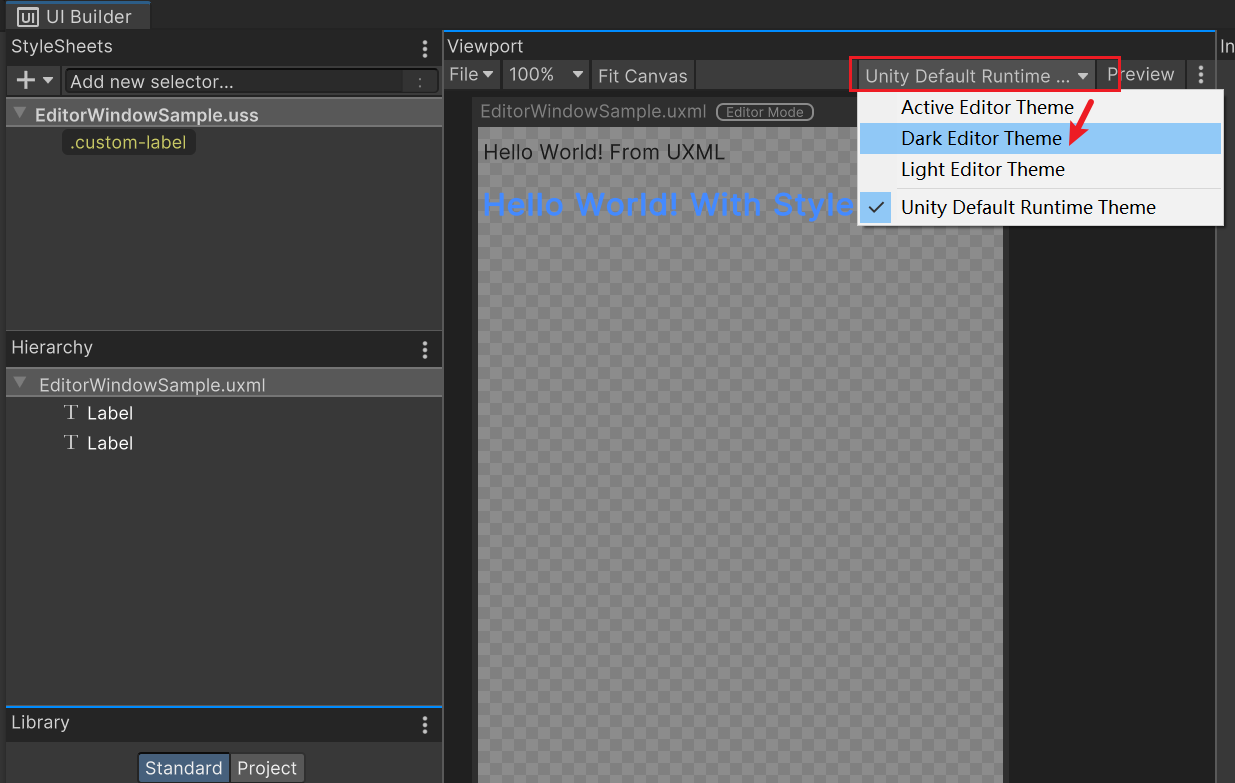
开启编辑器预览, 通常选择Active Editor Theme. 这里笔者选择的是暗色主题.
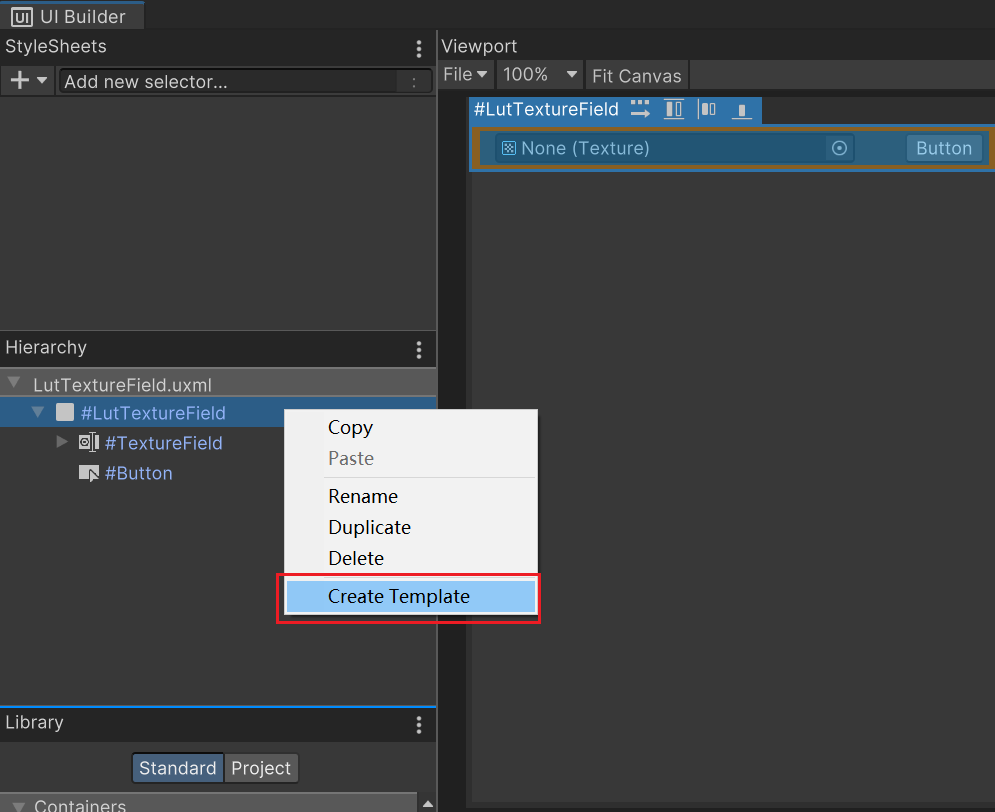
00.3 存储UI元素为模板以在代码中调用
在UI Builder中右键需要保存的UI元素, 选择Create Template以创建uxml文件. 后续可以在脚本中调用, 见具体案例部分.
00.4 Editor脚本的编辑
开启EditorWindowSample.cs文件, 内容如下. 建议添加的代码会用//Add On和//Add End进行包裹.
1
2
3
4
5
6
7
8
9
10
11
12
13
14
15
16
17
18
19
20
21
22
23
24
25
26
27
28
29
30
31
32
33
34
35
36
37
38
39
40
41
42
43
44
using UnityEditor;
using UnityEngine;
using UnityEngine.UIElements;

public class EditorWindowSample : EditorWindow
{
    // 这里是通过直接在脚本上赋予EditorWindowSample.uxml来进行关联的
    // 而EditorWindowSample.uss是直接通过UI Builder由EditorWindowSample.uxml引用的.
    [SerializeField]
    private VisualTreeAsset m_VisualTreeAsset = default;
    // Add On
    // 通过一个Vector2来设置窗口最小的Size, 以保证最低的UI排布
    private static Vector2 windowMinSize = new Vector2(500, 500);
    // Add End

    // 工具调用的窗口路径
    [MenuItem("Window/UI Toolkit/EditorWindowSample")]
    public static void ShowExample()
    {
        EditorWindowSample wnd = GetWindow<EditorWindowSample>();
        wnd.titleContent = new GUIContent("EditorWindowSample");
        // Add On
        // 设置窗口最小的Size
        wnd.minSize = windowMinSize;
        // Add End
    }

    public void CreateGUI()
    {
        // Each editor window contains a root VisualElement object
        // 必须声明rootVisualElement, 所有的UI元素都需要添加在Root中
        VisualElement root = rootVisualElement;

        // VisualElements objects can contain other VisualElement following a tree hierarchy.
        // 可以通过c#脚本添加UI元素
        VisualElement label = new Label("Hello World! From C#");
        root.Add(label);

        // Instantiate UXML
        // 也可以通过uxml文件的Instantiate方法来实例化UI元素并添加
        VisualElement labelFromUXML = m_VisualTreeAsset.Instantiate();
        root.Add(labelFromUXML);
    }
}
00.5 具体案例
通过设置全局着色器变量的预览工具.
1
2
3
4
5
6
7
8
9
10
11
12
13
14
15
16
17
18
19
20
21
22
23
24
25
26
27
28
29
30
31
32
33
34
35
36
37
38
39
40
41
42
43
44
45
46
47
48
49
50
51
52
53
54
55
56
57
58
59
60
61
62
63
64
65
66
67
68
69
70
71
72
73
74
75
76
77
78
79
80
81
82
83
84
85
86
87
88
89
90
91
92
93
94
95
96
97
98
99
100
101
102
103
104
105
106
107
108
109
110
111
112
113
114
115
116
117
118
119
120
121
122
123
124
125
126
127
128
129
130
131
132
133
134
135
using System;
using System.Collections.Generic;
using System.IO;
using UnityEditor;
using UnityEditor.UIElements;
using UnityEngine;
using UnityEngine.UIElements;
using Object = UnityEngine.Object;

/*----------------------------------------------------------------------------------------------------------------------
 * 参考网页
 * 读取UXML和USS文件 https://docs.unity3d.com/Manual/UIE-manage-asset-reference.html
 * 可参考文件
 * LightBatchingDebugger.cs
 * 示例中所有的字符串都建议用常量来保存以避免额外的GC
 ---------------------------------------------------------------------------------------------------------------------*/
public class LutPreviewer : EditorWindow
{
    private const string ResourcePath = "Packages/com.render.core/Editor/LutPreviewer/";
    private static VisualElement root;
    private static int lutFieldNum = 5;
    // 用于临时存储Lut贴图, 将UI和数据分离.
    private static readonly Dictionary<string, Texture2D> s_LutDictionary = new Dictionary<string, Texture2D>();
    private static readonly Vector2 s_WindowMinSize = new Vector2(500, 500);
    private VisualElement _lutArea;
    private IntegerField _lutFieldNumField;

    [MenuItem("Render/工具/LutPreviewer")]
    public static void ShowExample()
    {
        LutPreviewer wnd = GetWindow<LutPreviewer>();
        wnd.titleContent = new GUIContent("LutPreviewer");
        wnd.minSize = s_WindowMinSize;
    }

    // Create once, initialize
    public void CreateGUI()
    {
        // VisualTreeAsset uxml = AssetDatabase.LoadAssetAtPath<VisualTreeAsset>("Assets/Editor/main_window.uxml");
        // StyleSheet uss = AssetDatabase.LoadAssetAtPath<StyleSheet>("Assets/Editor/main_styles.uss");
        // VisualTreeAsset uxml = AssetDatabase.LoadAssetAtPath<VisualTreeAsset>("Packages/<name-of-the-package>/main_window.uxml");
        // StyleSheet uss = AssetDatabase.LoadAssetAtPath<StyleSheet>("Packages/<name-of-the-package>/main_styles.uss");

        root = rootVisualElement;
        CreateLutControls();
        CreateLutFields(lutFieldNum);
    }

    private void CreateLutControls()
    {
        var controlArea = new VisualElement
        {
            style = { flexDirection = FlexDirection.Row }
        };

        _lutFieldNumField = new IntegerField("Lut图栏位数")
        {
            value = lutFieldNum
        };
        _lutFieldNumField.RegisterValueChangedCallback(OnLutFieldNumChanged);

        var slider = new Slider("手动滑条", 0, 1)
        {
            style = { flexGrow = 1 }
        };
        slider.RegisterValueChangedCallback(value =>
        {
            if (value?.newValue != null)
            {
                Shader.SetGlobalFloat("_LutLerp", (float)value.newValue);
            }
        });
        controlArea.Add(_lutFieldNumField);
        controlArea.Add(slider);
        root.Add(controlArea);
    }

    private void CreateLutFields(int fieldCount)
    {
        _lutArea = new VisualElement();
        for (int i = 0; i < fieldCount; i++)
        {
            var lutFieldContainer = LoadLutFieldContainer(i);
            _lutArea.Add(lutFieldContainer);
        }
        root.Add(_lutArea);
    }

    private VisualElement LoadLutFieldContainer(int index)
    {
        // 读取存储模板的uxml文件来绘制UI元素, 将UI与逻辑分离
        var lutFieldContainer = AssetDatabase.LoadAssetAtPath<VisualTreeAsset>(Path.Combine(ResourcePath, "LutTextureField") + ".uxml").Instantiate();
        lutFieldContainer.name = "lutField" + index;

        ObjectField textureField = lutFieldContainer.Q<ObjectField>("TextureField");
        if (s_LutDictionary.TryGetValue(lutFieldContainer.name, out var value))
        {
            textureField.value = value;
        }
        void Callback(ChangeEvent<Object> evt)
        {
            s_LutDictionary[lutFieldContainer.name] = evt.newValue as Texture2D;
        }
        textureField.RegisterValueChangedCallback(Callback);
        var btn = lutFieldContainer.Q<Button>("Button");
        btn.text = "激活";
        btn.clickable.clicked += () => ActivateLut(textureField);

        return lutFieldContainer;
    }

    private void ActivateLut(ObjectField textureField)
    {
        if (textureField.value == null || textureField.value.GetType() != typeof(Texture2D)) return;
        Shader.SetGlobalTexture("_LutMap", (Texture2D)textureField.value);
    }

    private void OnLutFieldNumChanged(ChangeEvent<int> evt)
    {
        // 避免在删除这个数字时的重绘, 0时的重绘除了消除数据没有其他意义.
        if (evt.newValue == 0)
        {
            return;
        }
        lutFieldNum = evt.newValue;
        _lutArea.Clear();
        CreateLutFields(evt.newValue);
    }

    private void OnDisable()
    {
        Shader.SetGlobalFloat("_LutLerp", 0.0f);
        Shader.SetGlobalTexture("_LutMap", null);
    }
}
参考网页
Unity教程:使用UI Toolkit扩展Unity编辑器(五)USS样式&Debug调试 (youtube.com)
本文由作者按照 CC BY 4.0 进行授权