基于Jekyll和Github的Blog搭建
基于Jekyll和Github的Blog搭建
0. 起因
搭建一个基于Github Page的博客用来记录学习到的技巧和案例, 之前的选型是Rentry.co - Markdown Pastebin, 但每个文件需要记录一个Edit Code, 以及图床的问题, 于是开始搜索其他的方式. 最终选定了Github Page. 而搭建基于Github Page的博客, 按照官网的建议, 采用Jekyll. 于是, 痛苦踩坑之路开始了. 按照下面的步骤一步一步开始搭建自己的Blog.
1. 安装Jekyll编译需要的库和依赖
如果你不需要本地编译预览的话, 可以跳过这一步, 但我相信, 你不会喜欢每次上传仓库才能看到最终效果的. 所以还是先安装为好., 具体步骤参看Jekyll on Windows , 整理如下:
下载和安装Ruby+Devkit;(Ruby的安装路径中不能有空格, 所以不建议安装在
Program Files中, 笔者是直接安装在D盘根目录下)- 之后如果需要手动输入命令行请在Ruby的安装目录中进行, 即在
Ruby32-x64目录中, 通过在路径处输入cmd来启动命令行.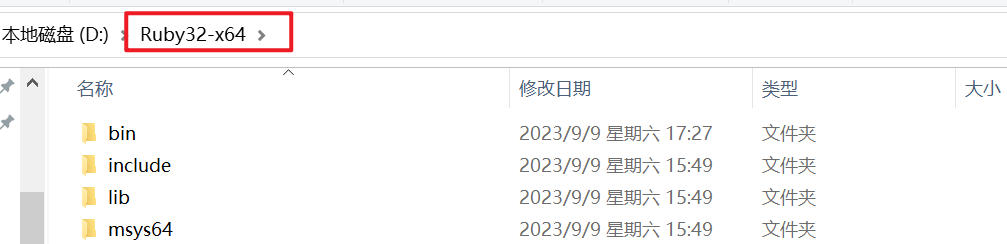
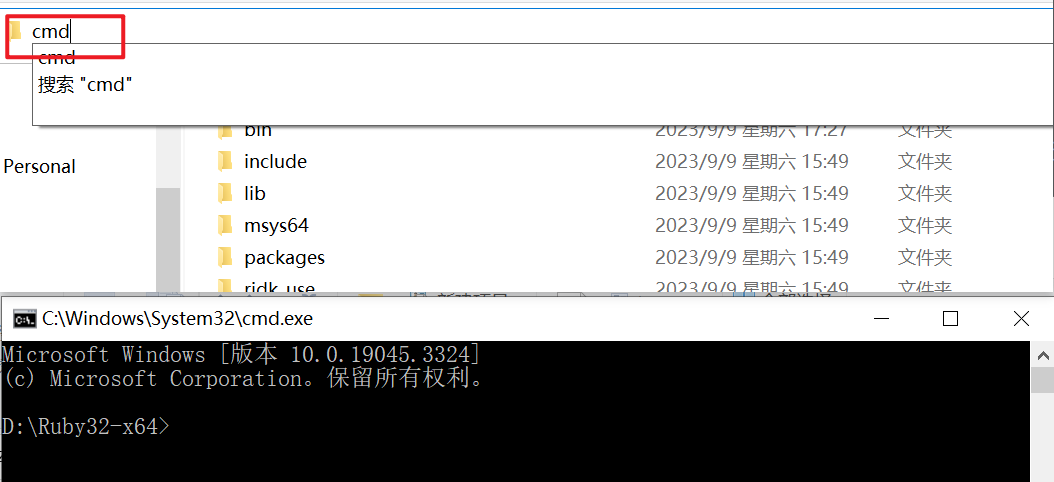
- 之后如果需要手动输入命令行请在Ruby的安装目录中进行, 即在
以管理员权限运行安装完之后, 会自动执行命令行(如果此时错过了, 可以之后在命令行中手动执行)
ridk install, 此时默认选择安装[1,3]项, 回车即可;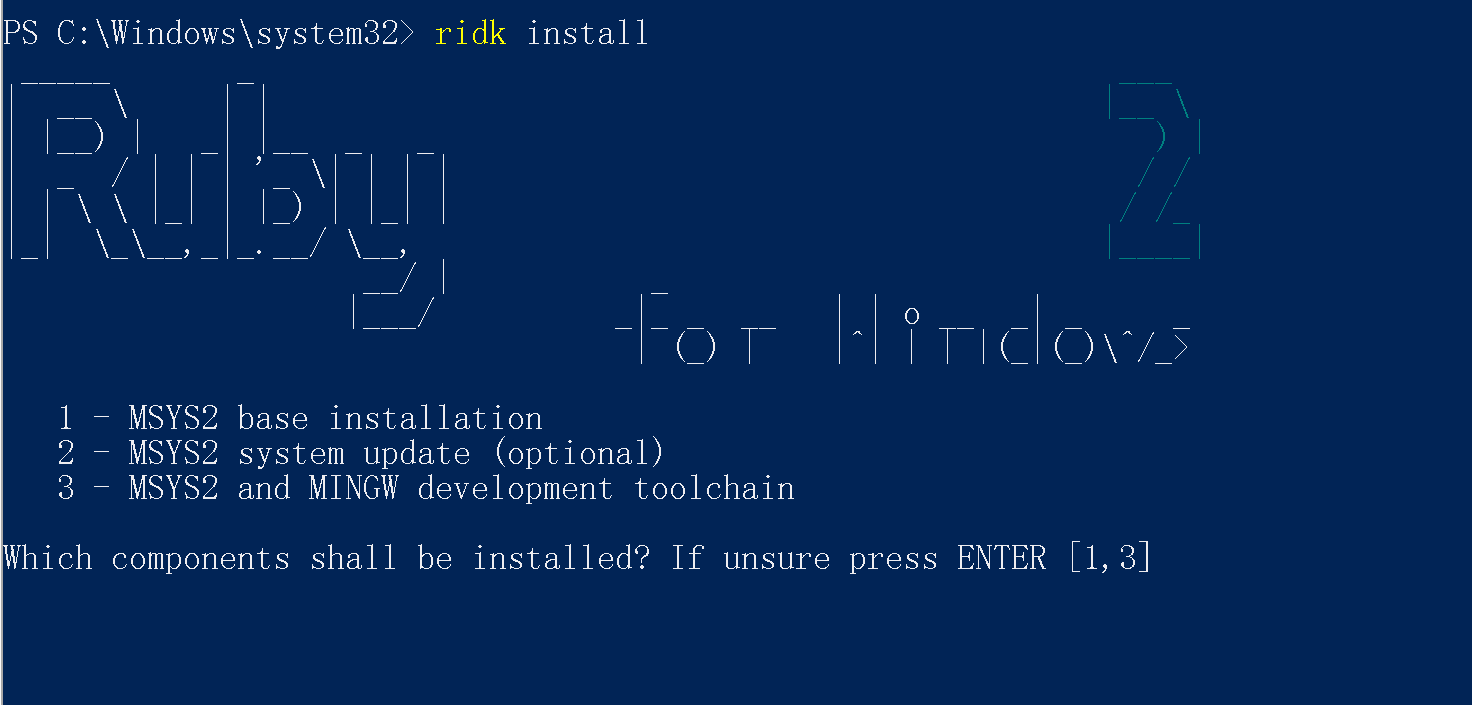
然后命令行执行
gem install jekyll bundler, 安装jekyll;(此时如果有梯子, 可能会产生反效果, 可以关闭后尝试)最后执行
jekyll -v,看是否成功安装, 成功的话, 会在命令行中显示jekyll的版本号.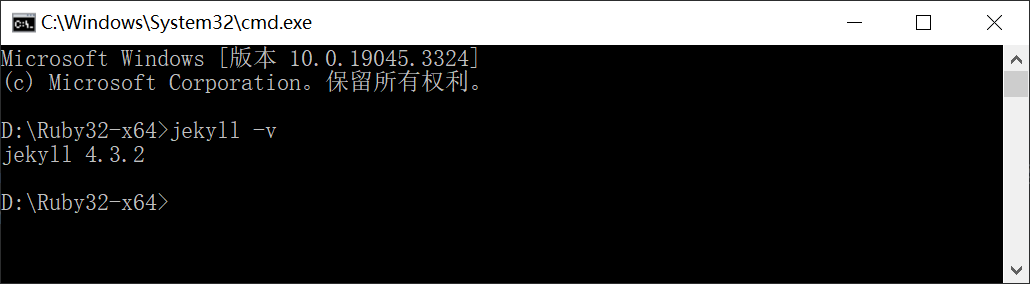
此时Jekyll布置完毕.
然后进入工程目录, 执行
bundle install如果下载困难, 则使用代理
1
2
3
set HTTP_PROXY=http://127.0.0.1:10809
set HTTPS_PROXY=http://127.0.0.1:10809
bundle install
之后可以拉起本地服务器
运行命令行
bundle exec jekyll s可以开启本地测试端, 开启后, 访问地址为http://127.0.0.1:4000/建议制作为一个.bat文件, 文件放置在工程根目录下, 内容如下
1
2
3
@echo off
bundle exec jekyll s
pause
2. 选择Theme
为什么先选择Theme? 正常来说, 先建立
##username.github.io的仓库, 然后复制theme并上传进行修改. 但这 次我选择theme功能有些复杂, 涉及到一些JS的编译, 所以先选择Theme, 然后按照Theme对应 的Guide一步一步来处理是更好的选择.
前往Jekyll Themes, 选中了Chirpy这个theme, 点击进入到Theme中.
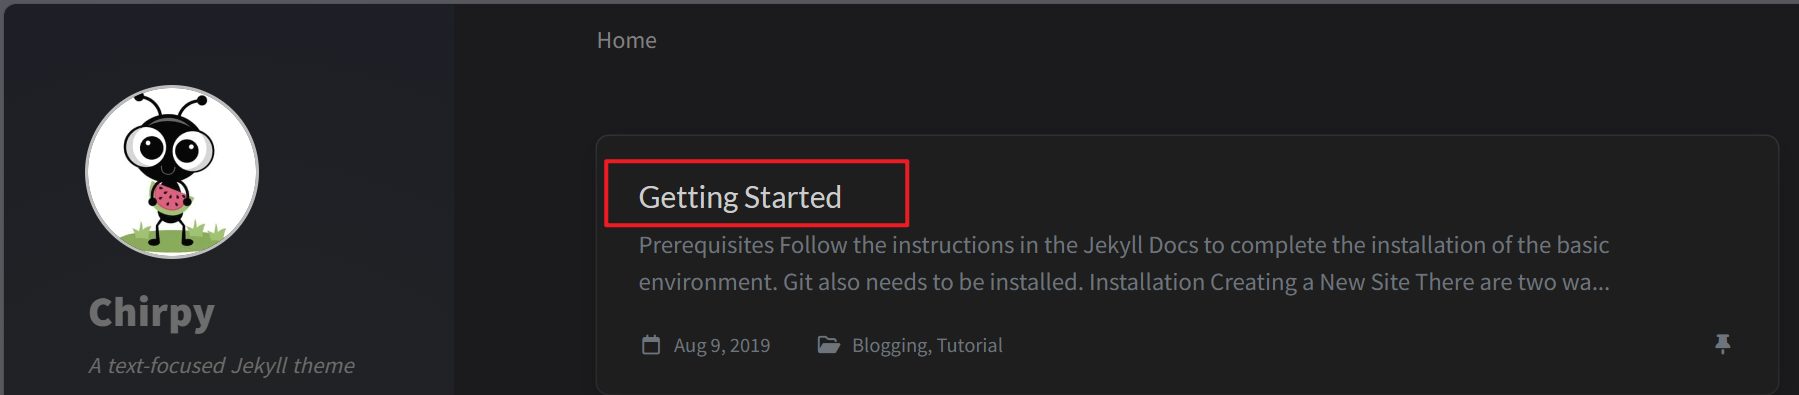
点击Demo->Getting Started 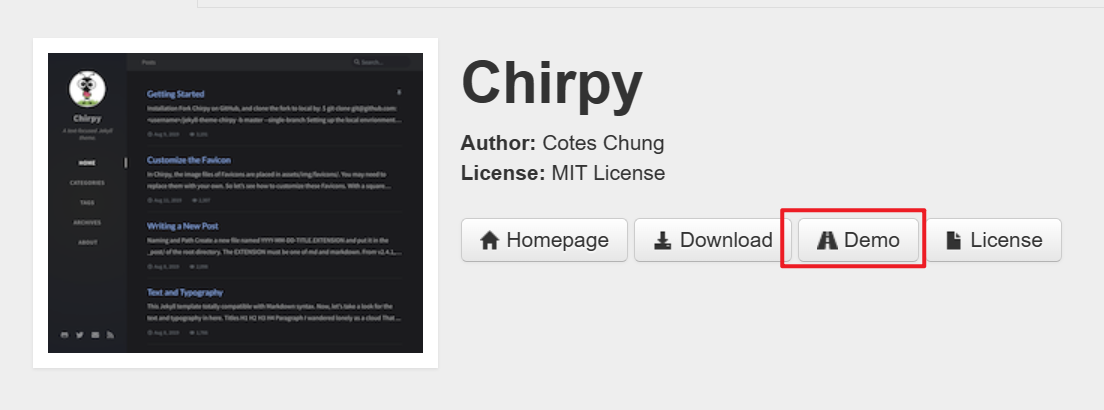
3. 基于作者的Github工程创建自己的Blog工程
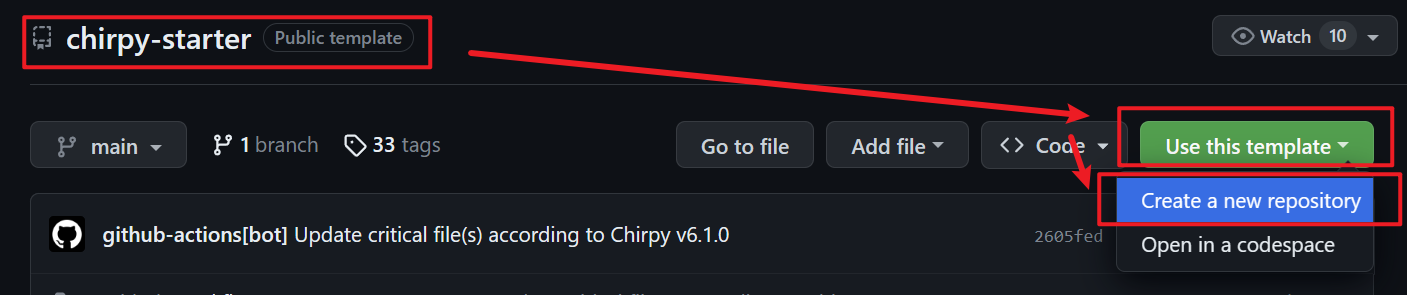 创建出的工程名称为
USERNAME.github.io, 其中USERNAME 需要修改为你自己的Github名称. 比如笔者的就是Jauved.github.io.
4. 开始部署基础环境并运行本地端
通过Git拉取创建的工程
在工程根目录下执行命令行
bundle, 此时会下载依赖库(梯子可能有反作用)(这个步骤中的命令行都在工程的根目录下执行)打开根目录下的
_config.yml进行配置, 笔者修改的项目如下lang: zh-CNtimezone: Asia/Shanghai, 时区的话, 哪个地方都行.title: Jauved, 这里需要换成你自己的名字.tagline: 一个学徒, 这里自行发挥.1 2
description: >- # used by seo meta and the atom feed 记录技术点的博客
url: 'https://jauved.github.io/', 这里需要将jauved替换为你的名字.- 后面的Github, twitter, 等等相关信息都替换为你自己的.
avatar: 'avatar.jpg', 头像路径, 笔者直接丢在了根目录, 可以按照需要放在其他地方, 最好是方形图片.
运行命令行
bundle exec jekyll s可以开启本地测试端, 开启后, 访问地址为http://127.0.0.1:4000/建议制作为一个.bat文件, 文件放置在工程根目录下, 内容如下
1
2
3
@echo off
bundle exec jekyll s
pause
5. 上传第一个文件
5.1 前置需求
上传的文件名格式需要是”YYYY-MM-DD-title”
然后需要在md文档中最上方加入
Front Matter, 代码行如下1 2 3 4 5 6 7
--- layout: layout: post # 这一行可以不用写, 默认就是该值 title: TITLE # 标题, 中文的话需要用""包裹 date: YYYY-MM-DD HH:MM:SS +/-TTTT # 这一行可以不用写 categories: [TOP_CATEGORIE, SUB_CATEGORIE] # e.g. [Unity, PBR] tags: [TAG] # 这里有点坑看例子就懂了, 用空格分割, 且不需要[]包裹, e.g. ComputeShader 视锥体剔除 ---
进入你的Github工程, 依次点击
Settings->Pages->Source切换为Github Actions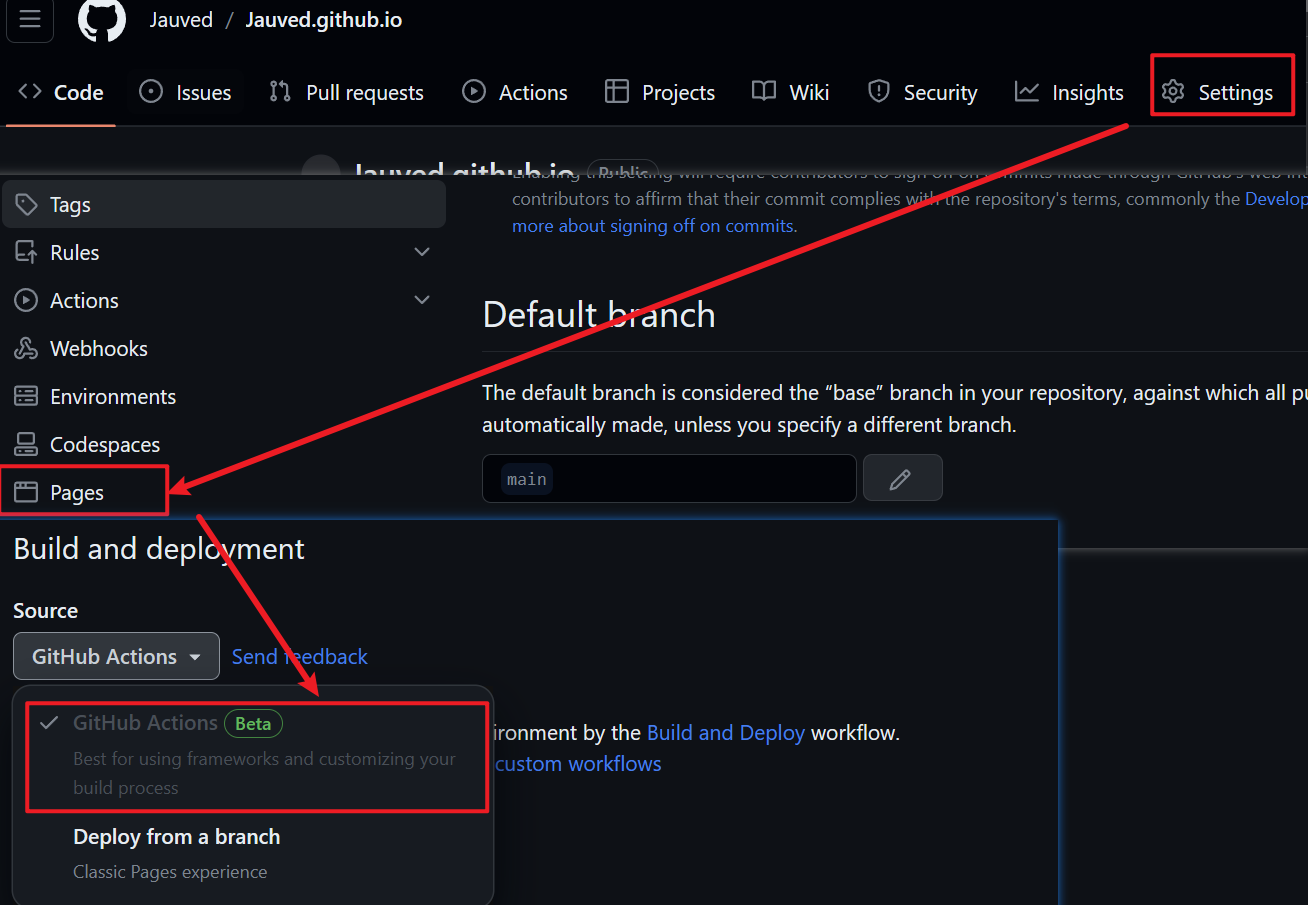
5.2 上传
将要上传的文件放置在
_posts文件夹下.在提交之前建议先从本地进行预览.
任何的提交动作, 都会自动触发
Github Actions.提交完毕之后, 通过
Action页签, 检查是否有错误, 如果有错误, 看下报错码来解决.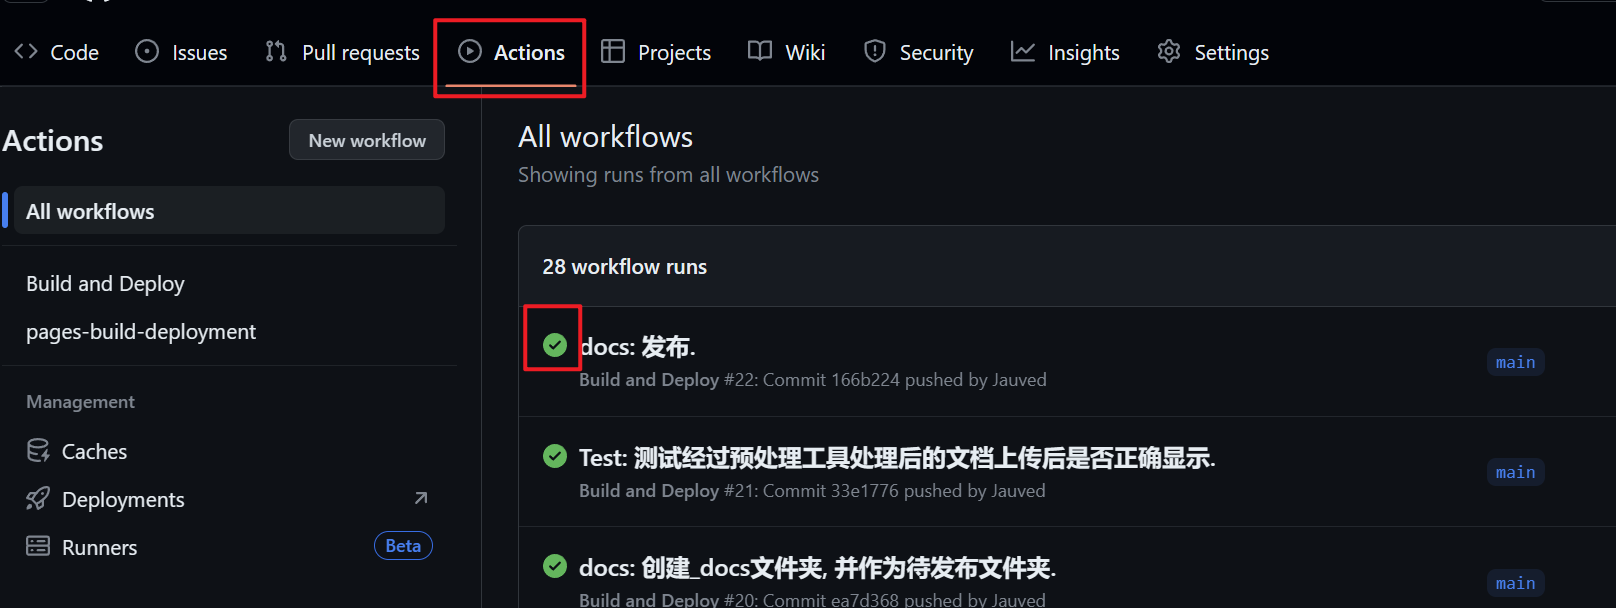
访问
https://jauved.github.io/, 其中jauved替换为你自己的名字, 就可以访问到你布置的Blog了.
6. Typora兼容
笔者使用Typora作为写作的软件, 而Jekyll使用的md语言是属于kramdown方言, 两者的语法会有差异
参考jekyll下Markdown的填坑技巧 | Weclome to eipi10, 进行处理.(笔者还没有开始处理, 开始处理后会尝试写相关的Blog)
Typora本地的图片加载和Jekyll的加载策略不同, 网站显示正常的图片在本地显示不正常.
笔者在工程根目录下创建了一个
_docs目录, 将文章源文件放置在里面在
_docs目录下放置一个.assets/image/文件夹用来放置图片, 设置好Typora.然后通过python的脚本, 完成以下工作
文本格式预处理
将
_docs/.assets/image/下的文件全部拷贝到/assets/image/中将
_docs下的.md文件拷贝到_post文件夹下, 并将其中的.assets/image/替换为/assets/image/.再将
.md文件重命名为.markdown.脚本代码附在文章最后.
7. 升级
尝试官方流程
- 升级的时候
bundle update阶段可能需要梯子, 通过以下命令格式设置临时的代理, 请将IP和端口号换成自己的梯子1 2
set HTTP_PROXY=http://127.0.0.1:10809 set HTTPS_PROXY=http://127.0.0.1:10809
升级Node
打开”应用和功能”, 找到现有的 Node.js, 点击”卸载”.
访问 https://github.com/coreybutler/nvm-windows/releases , 下载最新的
nvm-setup.zip并安装.- 新开命令行使用nvm命令
相关命令
1
2
3
4
5
6
7
8
9
10
11
12
# 列出可用的 Node.js 版本
nvm list available

# 安装最新版 LTS(例如 22.17.0)
nvm install 22.17.0

# 切换到该版本
nvm use 22.17.0

# 验证
node -v
npm -v
忽略以下野路子
- 如果发现自己的Blog无法通过
Action编译, 先尝试进行升级, 访问Blog的Git仓库, 以Zip的形式下载, 将文件进行覆盖升级
- 如果发现自己的Blog无法通过
重要:
_config.yml文件中, 由于有一些个人的配置, 建议使用对比工具进行合并, 或者你也可以选择重新录入一遍自定义的部分加入的htmlProofer会对http开头的链接进行报错而无法通过编译, 此时用命令参数允许即可
- 报错信息类似
http://www.aaa.com/ is not an HTTPS link
- 在自己的工程中的
.github\workflows\pages-deploy.yml文件中找到程序块, 加入\-\-no-enforce-https \, 这个命令是忽略对http网址的检查, 具体见htmlProof作者对于类似问题的回答.
1
2
3
4
5
6
  - name: Test site
          run: |
            bundle exec htmlproofer _site \
              \-\-disable-external \
              \-\-no-enforce-https \
              \-\-ignore-urls "/^http:\/\/127.0.0.1/,/^http:\/\/0.0.0.0/,/^http:\/\/localhost/"
另外,
<>会被识别为图片链接, 在不需要将这个识别为图片链接的时候, 用转义符\进行处理, 否则会报错报错信息类似于
image has no src or srcset attribute
8. 搜索失效
先本地拉起私服, 如果需要删除之前的文件可以先clean
1
2
bundle exec jekyll clean
bundle exec jekyll s
然后通过127.0.0.1:4000进行访问
F12拉出调试框, 选择上方的”网络”, 在Filter处填写”search.json”
- 此时状态如果不是200, 那么说明是json文件资源不存在
- 如果是200, 看下方的控制台是否有读取
search.json文件失败的log
如果是读取失败, 手动用IDE打开
_site\assets\js\data\search.json文件, 看有没有报错的Json行- 如果有
\会解析失败 - 如果有Tab会解析失败
- 如果有
通过Hook进行
search.json的再处理可以解决将单转义符替换为双转义符- 直接去掉”content”字段中的所有反斜杠
- 将Tab替换为四个空格
进入
_plugins目录创建
fix-search-json.rb文件, 内容如下, 此时再次拉起私服即搜索正常.1 2 3 4 5 6 7 8 9 10 11 12 13 14 15 16 17 18 19 20 21 22 23 24 25 26 27 28 29 30
# _plugins/fix-search-json.rb # 在 site 写入完毕后,对 search.json 做一次字段级别修正,并验证读写生效 require 'json' Jekyll::Hooks.register :site, :post_write do |site| path = site.in_dest_dir('assets', 'js', 'data', 'search.json') return unless File.exist?(path) # 读取文件并移除 BOM raw = File.binread(path) raw = raw.bytes.drop(3).pack("C*") if raw.bytes.first(3) == [0xEF, 0xBB, 0xBF] text = raw.force_encoding('utf-8') # 解析 JSON data = JSON.parse(text) # 遍历并清洗 content 字段中的所有反斜杠 data.each do |item| next unless item['content'].is_a?(String) # 清除 content 值中的反斜杠,不影响合法 JSON 转义 item['content'] = item['content'].delete('\\') end # 将修改后的结构写回文件 File.open(path, 'wb') do |f| f.write(JSON.generate(data)) end Jekyll.logger.info "FixSearchJSON:", "Repaired #{path}" end
9. 搜索数量被限制为10
Search Results Limited to 10 · Issue #458 · cotes2020/jekyll-theme-chirpy
下载jekyll-theme-chirpy主题Git的
_include文件夹下的search-loader.html文件.在你的工程根目录下新建
_include文件夹, 将下载到的search-loader.html文件放在其中打开并编辑, 在以下示例中添加
limit: 50类似的配置,50替换为期望的搜索结果数量1 2 3 4 5 6 7 8 9 10 11 12 13 14 15 16 17 18 19 20 21 22 23 24 25 26 27 28 29 30 31 32 33 34 35 36 37 38 39 40
<!-- Jekyll Simple Search loader See: <https://github.com/christian-fei/Simple-Jekyll-Search> --> <script> document.addEventListener('DOMContentLoaded', () => { SimpleJekyllSearch({ searchInput: document.getElementById('search-input'), resultsContainer: document.getElementById('search-results'), json: '/assets/js/data/search.json', searchResultTemplate: ' <article class="px-1 px-sm-2 px-lg-4 px-xl-0"> <header> <h2><a href="{url}">{title}</a></h2> <div class="post-meta d-flex flex-column flex-sm-row text-muted mt-1 mb-1"> {categories} {tags} </div> </header> <p>{content}</p> </article> ', noResultsText: '<p class="mt-5"></p>', limit: 50, templateMiddleware: function(prop, value, template) { if (prop === 'categories') { if (value === '') { return `${value}`; } else { return `<div class="me-sm-4"><i class="far fa-folder fa-fw"></i>${value}</div>`; } } if (prop === 'tags') { if (value === '') { return `${value}`; } else { return `<div><i class="fa fa-tag fa-fw"></i>${value}</div>`; } } } }); }); </script>
10. 附录:
参考网页
- Jekyll Themes
- Getting Started | Chirpy (cotes.page)
- Writing a New Post | Chirpy (cotes.page)
- Jekyll模板升级笔记 | 不太皮的九叔 (ny9s.com)
- 無痛轉移 Medium 到自架網站. 將 Medium 內容搬遷至 Github Pages (with… | by ZhgChgLi | ZRealm Dev. | Medium
- kukisama/kukisama.github.io at gh-pages
- Markdown 基本语法 | Markdown指南中文版
- 关于博客搭建过程的一些总结和吐槽 | Sharzy
- jekyll下Markdown的填坑技巧 | Weclome to eipi10
- kramdown基本语法 - 知乎 (zhihu.com)
- kramdown和markdown较大的差异比较 | Hom (gohom.win)
- jekyll-theme-chirpy | puppylpg
脚本代码
1
2
3
4
5
6
7
8
9
10
11
12
13
14
15
16
17
18
19
20
21
22
23
24
25
26
27
28
29
30
31
32
33
34
35
36
37
38
39
40
41
42
43
44
45
46
47
48
49
50
51
52
53
54
55
56
57
58
59
60
61
62
63
64
65
66
67
68
69
70
71
72
73
74
75
76
77
78
79
80
81
82
83
84
85
86
87
88
89
90
91
92
93
94
95
96
97
98
99
100
101
102
103
104
105
106
107
108
109
110
111
112
113
114
115
116
117
118
119
120
121
122
123
124
125
126
127
128
129
130
131
132
133
134
135
136
137
138
139
140
141
142
143
144
145
146
147
148
149
150
151
152
153
154
155
156
157
158
159
160
161
162
163
164
165
166
167
168
169
170
171
172
173
174
175
176
177
178
179
180
181
182
183
184
185
186
187
188
189
190
191
192
193
194
195
196
197
198
199
200
201
202
203
204
205
206
207
208
209
210
211
212
213
214
215
216
217
218
219
220
221
222
223
224
225
226
227
228
229
230
231
232
233
234
235
236
237
238
239
240
241
242
243
244
        import os
        import shutil
        import re
        import sys

        if getattr(sys, 'frozen', False):
            # 如果脚本被编译成了一个可执行文件
            script_dir = os.path.dirname(sys.executable)
        else:
            # 如果脚本是直接从Python源文件运行的
            script_dir = os.path.dirname(os.path.abspath(__file__))


        # Step 1: 复制前的文档格式处理
        def pre_copy_formatting():
            # 此处留空,将来用于处理复制前的文档格式
            pass


        # Step 2: 文件迁移
        def file_migration():
            # 获取脚本文件所在的绝对路径
            # script_dir = os.path.dirname(os.path.abspath(__file__))
            source_dir = script_dir
            target_dir = os.path.join(script_dir, "../_posts")

            # 检查目标文件夹是否存在,如果不存在则创建
            if not os.path.exists(target_dir):
                user_input = input("目标文件夹(_posts)不存在, 是否需要创建? (y/n, default is y): ").strip().lower()
                if user_input == "y" or user_input == "":
                    try:
                        os.makedirs(target_dir)
                        print(f"目标文件夹 '{target_dir}' 已创建.")
                    except Exception as e:
                        print(f"创建目标文件夹时发生错误: {e}")
                        return
                else:
                    print("File migration aborted.")
                    return

            # 获取源目录中的所有文件和文件夹
            all_items = os.listdir(source_dir)

            # 打印所有找到的项目(用于调试)
            # print(f"All items in source directory ({len(all_items)}):")
            # for item in all_items:
            #     print(f"  - {item}")

            # 获取所有.md文件的列表
            md_files = [f for f in all_items if f.endswith(".md") and f != os.path.basename(__file__)]

            # 打印.md文件的数量和名称
            print(f"\nFound {len(md_files)} .md files:")
            for file_name in md_files:
                print(f"  - {file_name}")

            # 询问用户是否要继续
            user_input = input("是否进行文件迁徙? (y/n, default is y ): ").strip().lower()
            if user_input == "y" or user_input == "":
                # 如果用户选择继续或直接按回车,则复制文件
                for file_name in md_files:
                    full_file_name = os.path.join(source_dir, file_name)
                    if os.path.isfile(full_file_name):
                        try:
                            shutil.copy(full_file_name, target_dir)
                            print(f"Copied {file_name} to {target_dir}")
                        except Exception as e:
                            print(f"复制文件时发生错误: {e}")
            else:
                # 如果用户选择不继续,则退出
                print("File migration aborted.")
                return


        # Step 3: 图片迁移
        def image_migration():
            # 获取脚本文件所在的绝对路径
            # script_dir = os.path.dirname(os.path.abspath(__file__))
            source_dir = os.path.join(script_dir, ".assets/image")
            target_dir = os.path.join(script_dir, "../assets/image")

            # 检查源文件夹是否存在
            if not os.path.exists(source_dir):
                print(f"源文件夹 '{source_dir}' 不存在.")
                return

            # 检查目标文件夹是否存在,如果不存在则创建
            if not os.path.exists(target_dir):
                user_input = input("目标文件夹(assets/image)不存在, 是否需要创建? (y/n, default is y): ").strip().lower()
                if user_input == "y" or user_input == "":
                    try:
                        os.makedirs(target_dir)
                        print(f"目标文件夹 '{target_dir}' 已创建.")
                    except Exception as e:
                        print(f"创建目标文件夹时发生错误: {e}")
                        return
                else:
                    print("Image migration aborted.")
                    return

            # 获取源目录中的所有文件和文件夹
            all_items = os.listdir(source_dir)

            # 打印所有找到的项目(用于调试)
            # print(f"All items in source directory ({len(all_items)}):")
            # for item in all_items:
            #     print(f"  - {item}")

            # 获取所有图片文件的列表
            image_files = [f for f in all_items if f.endswith(("png", "jpg", "jpeg", "gif", "bmp"))]

            # 打印图片文件的数量和名称
            print(f"\nFound {len(image_files)} image files:")
            for file_name in image_files:
                print(f"  - {file_name}")

            # 询问用户是否要继续
            user_input = input("是否进行图片迁徙? (y/n, default is y): ").strip().lower()
            if user_input == "y" or user_input == "":
                # 如果用户选择继续或直接按回车,则复制文件
                for file_name in image_files:
                    full_file_name = os.path.join(source_dir, file_name)
                    if os.path.isfile(full_file_name):
                        try:
                            shutil.copy(full_file_name, target_dir)
                            print(f"Copied {file_name} to {target_dir}")
                        except Exception as e:
                            print(f"复制文件时发生错误: {e}")
            else:
                # 如果用户选择不继续,则退出
                print("Image migration aborted.")


        # Step 4: 更新图片链接
        def update_image_links():
            # 获取脚本文件所在的绝对路径
            # script_dir = os.path.dirname(os.path.abspath(__file__))
            target_dir = os.path.join(script_dir, "../_posts")

            # 检查目标文件夹是否存在
            if not os.path.exists(target_dir):
                print(f"目标文件夹 '{target_dir}' 不存在.")
                return

            # 获取目标目录中的所有文件和文件夹
            all_items = os.listdir(target_dir)

            # 获取所有.md文件的列表
            md_files = [f for f in all_items if f.endswith(".md")]

            # 打印.md文件的数量和名称
            print(f"\nFound {len(md_files)} .md files:")
            for file_name in md_files:
                print(f"  - {file_name}")

            # 询问用户是否要继续
            user_input = input("是否将图片链接按照发布格式更新? (y/n, default is y): ").strip().lower()
            if user_input == "y" or user_input == "":
                # 如果用户选择继续或直接按回车,则更新每个文件中的图片链接
                for file_name in md_files:
                    full_file_name = os.path.join(target_dir, file_name)
                    if os.path.isfile(full_file_name):
                        try:
                            # 打开文件并读取内容
                            with open(full_file_name, 'r', encoding='utf-8') as file:
                                content = file.read()

                            # 找到并打印所有匹配的图片链接
                            matched_links = re.findall(r'\.assets/image/(.+?\.(png|jpg|jpeg|gif|bmp))', content)
                            print(f"\nFound {len(matched_links)} matched links in {file_name}:")
                            for link in matched_links:
                                print(f"  - {link[0]}")

                            # 更新图片链接
                            updated_content = re.sub(r'\.assets/image/(.+?\.(png|jpg|jpeg|gif|bmp))', r'/assets/image/\1',
                                                     content)

                            # 将更新后的内容保存回文件
                            with open(full_file_name, 'w', encoding='utf-8') as file:
                                file.write(updated_content)

                            print(f"Updated image links in {file_name}")
                        except Exception as e:
                            print(f"处理文件时发生错误: {e}")
            else:
                # 如果用户选择不继续,则退出
                print("Update image links aborted.")


        # Step 5: 更新文件扩展名
        def update_file_extension():
            # 获取脚本文件所在的绝对路径
            # script_dir = os.path.dirname(os.path.abspath(__file__))
            target_dir = os.path.join(script_dir, "../_posts")

            # 检查目标文件夹是否存在
            if not os.path.exists(target_dir):
                print(f"目标文件夹 '{target_dir}' 不存在.")
                return

            # 获取目标目录中的所有文件和文件夹
            all_items = os.listdir(target_dir)

            # 获取所有.md文件的列表
            md_files = [f for f in all_items if f.endswith(".md")]

            # 打印.md文件的数量和名称
            print(f"\nFound {len(md_files)} .md files:")
            for file_name in md_files:
                print(f"  - {file_name}")

            # 询问用户是否要继续
            user_input = input("是否将处理后的文件的扩展名从.md更新为.markdown? (y/n, default is y): ").strip().lower()
            if user_input == "y" or user_input == "":
                # 如果用户选择继续,则更改每个文件的扩展名
                for file_name in md_files:
                    full_file_name = os.path.join(target_dir, file_name)
                    new_file_name = os.path.splitext(full_file_name)[0] + ".markdown"

                    # 检查新的文件名是否已经存在
                    if os.path.exists(new_file_name):
                        os.remove(new_file_name)
                        print(f"Existing file {new_file_name} has been removed.")

                    os.rename(full_file_name, new_file_name)
                    print(f"Changed extension of {file_name} to .markdown")
            else:
                # 如果用户选择不继续,则退出
                print("Update file extension aborted.")


        # 主函数,依次调用上述五个函数
        def main():
            pre_copy_formatting()
            file_migration()
            image_migration()
            update_image_links()
            update_file_extension()


        # 如果这个脚本是直接运行的,则调用main函数
        if __name__ == "__main__":
            main()