编译 Disney BRDF Explorer
编译 Disney BRDF Explorer
00 阅读文档
brdf/README-WIN32 at main · wdas/brdf
1
2
3
4
5
6
7
8
9
10
11
12
13
How to compile BRDF Explorer for Windows
========================================

The following external dependencies are required (versions are ones that I used, other might also work):
	- Qt 4.8.1
	- GLEW 1.9.0
	- ZLib 1.2.5
	- GLUT 3.7

Make sure that qmake is in your PATH. Also put GLEW, ZLib and GLUT include and library directories somewhere VC can find them.

Open Visual Studio 2010 command prompt and navigate to brdf project root directory.
Run "qmake -r -tp vc prefix=foo", this will generate the vcxproj and sln files.
可以看到各种的依赖库.
注意:
- 根据代码分析, Qt用Qt5, Zlib用1.2.11.
- GLUT从2005年就不维护和更新了, 换成freeglut
01 安装Qt Creator
但根据其他用户的编译经验, 用Qt5.14.1也可以编译成功. 下载链接如下:
Index of /archive/qt/5.14/5.14.1
安装需要注册Qt Account
安装的时候, 除了默认自动勾选的Qt Creator之外, 勾选MSVC 2017 32-bit.
02 拉取仓库
03 在Qt Creator中打开项目
打开->文件或项目->选择main.pro
后续操作需要先安装MSVC 2022 C++编译器, 所以我们在第5步的时候来做.
04 编译Zlib
04a 拉取工程
进入官网zlib Home Site
找到Git仓库目录madler/zlib: A massively spiffy yet delicately unobtrusive compression library.
Clone工程
切换Tag到1.2.5
切换Tag到1.2.11, 在工程中启用git bash, 输入以下命令
1
git checkout v1.2.11
反馈为
1
2
3
4
5
6
7
8
9
10
11
12
13
14
15
16
17
18
19
20
$ git checkout v1.2.11
Note: switching to 'v1.2.11'.

You are in 'detached HEAD' state. You can look around, make experimental
changes and commit them, and you can discard any commits you make in this
state without impacting any branches by switching back to a branch.

If you want to create a new branch to retain commits you create, you may
do so (now or later) by using -c with the switch command. Example:

  git switch -c <new-branch-name>

Or undo this operation with:

  git switch -

Turn off this advice by setting config variable advice.detachedHead to false

HEAD is now at 9712272 zlib 1.2.11
你可以用以下命令(任选其一)来确定当前是不是处于tag1.2.11, 输出为1.2.11或HEAD detached at v1.2.11即为正常
1
2
3
git describe --tags

git status
04b 布置编译环境
运行Visual Studio Installer, 勾选如下:
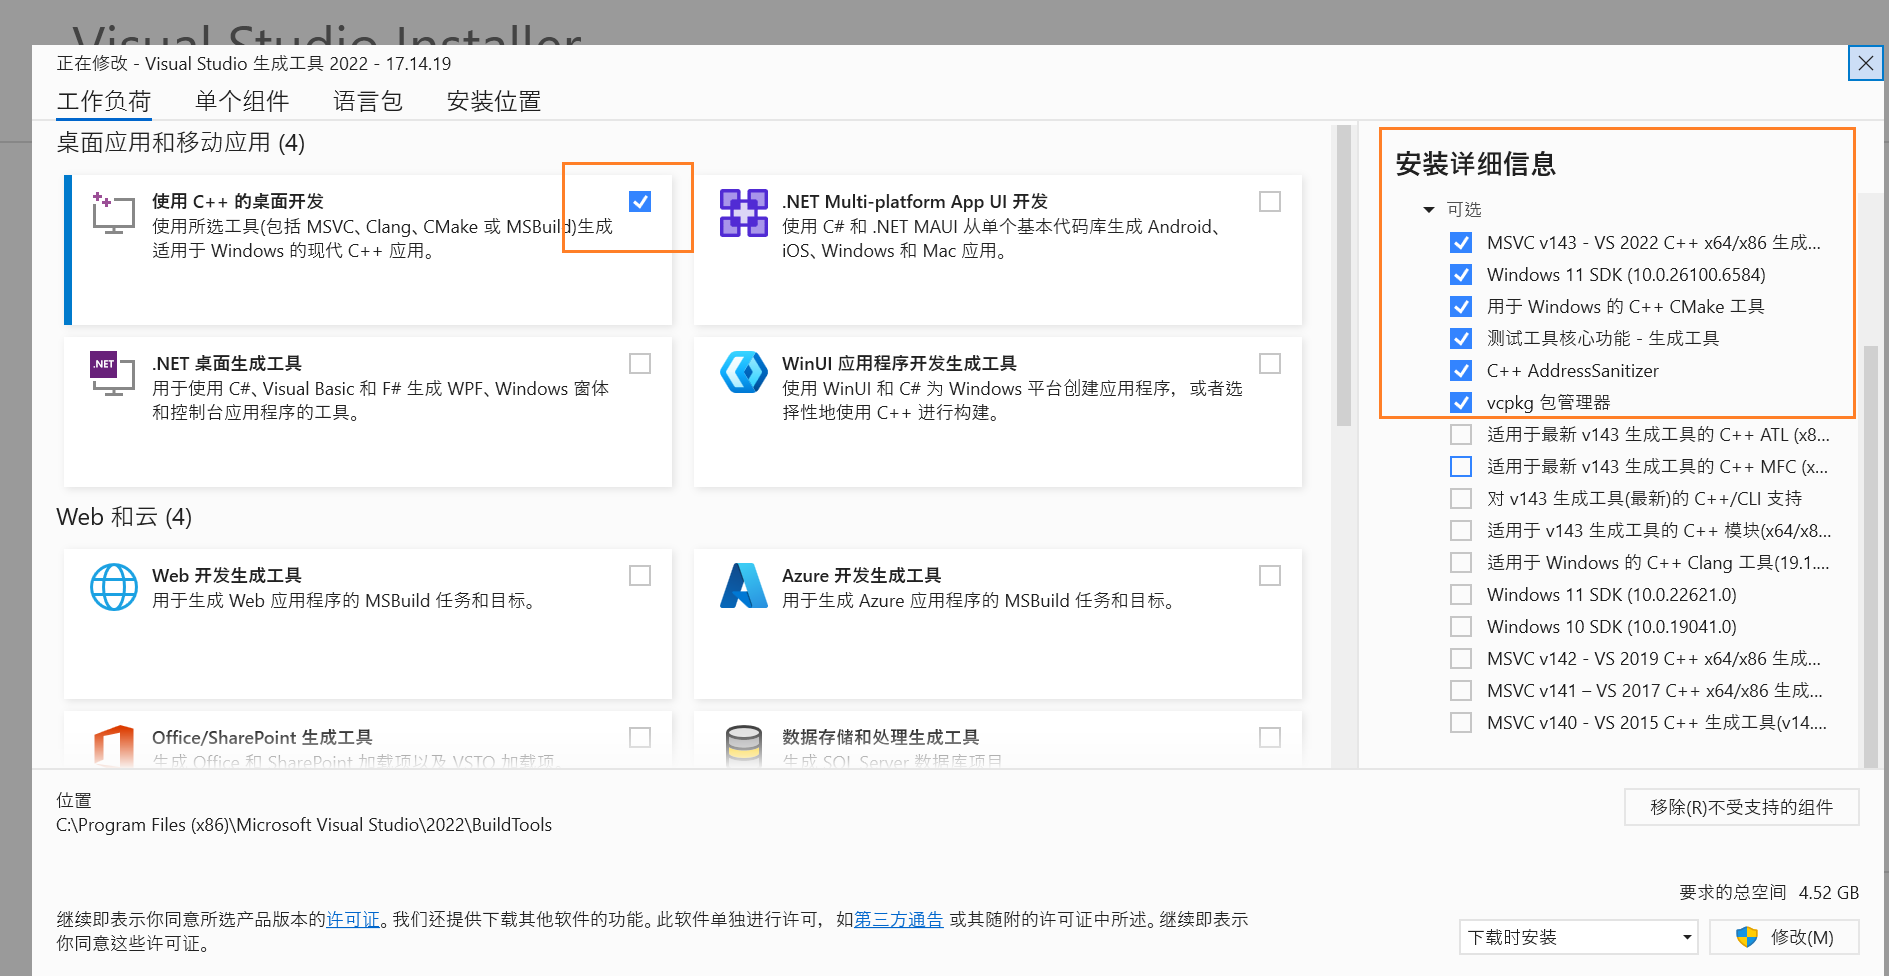
04c 编译
启动Visual Studio 2022 Developer Command Prompt , 运行nmake /?, 如果出现以下输出, 则环境布置成功.
1
2
3
4
5
6
7
8
9
10
11
12
13
14
15
16
17
18
19
20
21
22
23
24
25
26
27
28
29
30
31
32
33
34
35
36
**********************************************************************
** Visual Studio 2022 Developer Command Prompt v17.14.19
** Copyright (c) 2025 Microsoft Corporation
**********************************************************************

C:\Program Files (x86)\Microsoft Visual Studio\2022\BuildTools>nmake /?

Microsoft (R) 程序维护实用工具 14.44.35219.0 版
版权所有 (C) Microsoft Corporation。  保留所有权利。

用法:     NMAKE @commandfile
        NMAKE [选项] [/f makefile] [/x stderrfile] [macrodefs] [targets]

选项:

/A 生成所有已计算的目标
/B 如果时间戳相等则生成
/C 取消输出消息
/D 显示生成消息
/E 覆盖 env-var 宏
/ERRORREPORT:{NONE|PROMPT|QUEUE|SEND} 向 Microsoft 报告错误
/G 显示 !include 文件名
/HELP 显示简短的用法消息
/I 忽略命令中的退出代码
/K 遇到错误时继续生成不相关的目标
/N 显示命令但不执行
/NOLOGO 取消显示版权信息
/P 显示 NMAKE 信息
/Q 检查时间戳但不生成
/R 忽略预定义的规则/宏
/S 取消显示已执行的命令
/T 更改时间戳但不生成
/U 转储内联文件
/Y 禁用批处理模式
/W 显示任何失败的子进程的完整命令
/? 显示简短用法消息
此时, 在当前窗口继续输入以下命令cd /d E:\Projects\zlib, 进入Zlib的工程目录(已经切换到1.2.11), 当然你需要将E:\Projects\zlib换成你自己的目录.
如果直接使用nmake -f win32\Makefile.msc进行编译, 则会报错
1
2
3
4
5
infback.obj : error LNK2019: 无法解析的外部符号 _inflate_fast,函数 _inflateBack 中引用了该符号
inflate.obj : error LNK2001: 无法解析的外部符号 _inflate_fast
zlib1.dll : fatal error LNK1120: 1 个无法解析的外部命令
NMAKE : fatal error U1077: “link -nologo -debug -incremental:no -opt:ref -def:win32/zlib.def -dll -implib:zdll.lib  -out:zlib1.dll -base:0x5A4C0000 adler32.obj compress.obj crc32.obj deflate.obj gzclose.obj gzlib.obj gzread.obj  gzwrite.obj infback.obj inflate.obj inftrees.obj trees.obj uncompr.obj zutil.obj  zlib1.res”: 返回代码“0x460”
Stop.
原因是1.2.5的仓库的:Makefile.msc漏写了inffast.obj, 用任何的文本编辑器, 打开Zlib仓库的win32目录下的Makefile.msc, 找到如下代码行, 将inffast.obj加入(我是加在第二行的第三个obj的位置), 加入后代码如下
1
2
3
OBJS = adler32.obj compress.obj crc32.obj deflate.obj gzclose.obj gzlib.obj gzread.obj \
       gzwrite.obj infback.obj inffast.obj inflate.obj inftrees.obj trees.obj uncompr.obj zutil.obj
OBJA =
在 Windows 上使用 nmake 编译 zlib-1.2.5 时,会出现
unresolved external symbol inflate_fast错误。 原因是官方的 Makefile.msc 在 OBJS 列表中遗漏了inffast.obj。 日本博客 “Windows で zlib をビルドすると inflate_fast が undefined になる問題の対処方法” (https://koukotsu.org/blog/2012/01/zlib-inflate_fast.html) 给出的解决方法是:在 win32/Makefile.msc 的 OBJS 列表中加入inffast.obj, 然后重新执行nmake -f win32\Makefile.msc即可成功编译。
1.2.11版本无以上错误.
此时再运行nmake -f win32\Makefile.msc, 输出为:
1
2
3
4
5
6
7
8
9
10
11
12
13
14
15
16
17
18
19
20
21
22
23
24
25
26
27
28
29
30
31
32
33
34
35
36
37
38
39
40
41
42
43
44
45
46
47
48
49
50
51
52
53
54
55
E:\Projects\zlib>nmake -f win32\Makefile.msc

Microsoft (R) 程序维护实用工具 14.44.35219.0 版
版权所有 (C) Microsoft Corporation。  保留所有权利。

        cl -c -D_CRT_SECURE_NO_DEPRECATE -D_CRT_NONSTDC_NO_DEPRECATE -nologo -MD -W3 -O2 -Oy- -Zi -Fd"zlib"  .\adler32.c
adler32.c
        cl -c -D_CRT_SECURE_NO_DEPRECATE -D_CRT_NONSTDC_NO_DEPRECATE -nologo -MD -W3 -O2 -Oy- -Zi -Fd"zlib"  .\compress.c
compress.c
        cl -c -D_CRT_SECURE_NO_DEPRECATE -D_CRT_NONSTDC_NO_DEPRECATE -nologo -MD -W3 -O2 -Oy- -Zi -Fd"zlib"  .\crc32.c
crc32.c
        cl -c -D_CRT_SECURE_NO_DEPRECATE -D_CRT_NONSTDC_NO_DEPRECATE -nologo -MD -W3 -O2 -Oy- -Zi -Fd"zlib"  .\deflate.c
deflate.c
        cl -c -D_CRT_SECURE_NO_DEPRECATE -D_CRT_NONSTDC_NO_DEPRECATE -nologo -MD -W3 -O2 -Oy- -Zi -Fd"zlib"  .\gzclose.c
gzclose.c
        cl -c -D_CRT_SECURE_NO_DEPRECATE -D_CRT_NONSTDC_NO_DEPRECATE -nologo -MD -W3 -O2 -Oy- -Zi -Fd"zlib"  .\gzlib.c
gzlib.c
        cl -c -D_CRT_SECURE_NO_DEPRECATE -D_CRT_NONSTDC_NO_DEPRECATE -nologo -MD -W3 -O2 -Oy- -Zi -Fd"zlib"  .\gzread.c
gzread.c
        cl -c -D_CRT_SECURE_NO_DEPRECATE -D_CRT_NONSTDC_NO_DEPRECATE -nologo -MD -W3 -O2 -Oy- -Zi -Fd"zlib"  .\gzwrite.c
gzwrite.c
        cl -c -D_CRT_SECURE_NO_DEPRECATE -D_CRT_NONSTDC_NO_DEPRECATE -nologo -MD -W3 -O2 -Oy- -Zi -Fd"zlib"  .\infback.c
infback.c
        cl -c -D_CRT_SECURE_NO_DEPRECATE -D_CRT_NONSTDC_NO_DEPRECATE -nologo -MD -W3 -O2 -Oy- -Zi -Fd"zlib"  .\inflate.c
inflate.c
        cl -c -D_CRT_SECURE_NO_DEPRECATE -D_CRT_NONSTDC_NO_DEPRECATE -nologo -MD -W3 -O2 -Oy- -Zi -Fd"zlib"  .\inftrees.c
inftrees.c
        cl -c -D_CRT_SECURE_NO_DEPRECATE -D_CRT_NONSTDC_NO_DEPRECATE -nologo -MD -W3 -O2 -Oy- -Zi -Fd"zlib"  .\inffast.c
inffast.c
        cl -c -D_CRT_SECURE_NO_DEPRECATE -D_CRT_NONSTDC_NO_DEPRECATE -nologo -MD -W3 -O2 -Oy- -Zi -Fd"zlib"  .\trees.c
trees.c
        cl -c -D_CRT_SECURE_NO_DEPRECATE -D_CRT_NONSTDC_NO_DEPRECATE -nologo -MD -W3 -O2 -Oy- -Zi -Fd"zlib"  .\uncompr.c
uncompr.c
        cl -c -D_CRT_SECURE_NO_DEPRECATE -D_CRT_NONSTDC_NO_DEPRECATE -nologo -MD -W3 -O2 -Oy- -Zi -Fd"zlib"  .\zutil.c
zutil.c
        lib -nologo -out:zlib.lib adler32.obj compress.obj crc32.obj deflate.obj gzclose.obj gzlib.obj gzread.obj  gzwrite.obj infback.obj inflate.obj inftrees.obj inffast.obj trees.obj uncompr.obj zutil.obj
        rc /dWIN32 /r /fozlib1.res ./win32/zlib1.rc
Microsoft (R) Windows (R) Resource Compiler Version 10.0.10011.16384
Copyright (C) Microsoft Corporation.  All rights reserved.

        link -nologo -debug -incremental:no -opt:ref -def:./win32/zlib.def -dll -implib:zdll.lib  -out:zlib1.dll -base:0x5A4C0000 adler32.obj compress.obj crc32.obj deflate.obj gzclose.obj gzlib.obj gzread.obj  gzwrite.obj infback.obj inflate.obj inftrees.obj inffast.obj trees.obj uncompr.obj zutil.obj  zlib1.res
  正在创建库 zdll.lib 和对象 zdll.exp
        if exist zlib1.dll.manifest  mt -nologo -manifest zlib1.dll.manifest -outputresource:zlib1.dll;2
        cl -c -I. -D_CRT_SECURE_NO_DEPRECATE -D_CRT_NONSTDC_NO_DEPRECATE -nologo -MD -W3 -O2 -Oy- -Zi -Fd"zlib"  ./test\example.c
example.c
        link -nologo -debug -incremental:no -opt:ref example.obj zlib.lib
        if exist example.exe.manifest  mt -nologo -manifest example.exe.manifest -outputresource:example.exe;1
        cl -c -I. -D_CRT_SECURE_NO_DEPRECATE -D_CRT_NONSTDC_NO_DEPRECATE -nologo -MD -W3 -O2 -Oy- -Zi -Fd"zlib"  ./test\minigzip.c
minigzip.c
        link -nologo -debug -incremental:no -opt:ref minigzip.obj zlib.lib
        if exist minigzip.exe.manifest  mt -nologo -manifest minigzip.exe.manifest -outputresource:minigzip.exe;1
        link -nologo -debug -incremental:no -opt:ref -out:example_d.exe example.obj zdll.lib
        if exist example_d.exe.manifest  mt -nologo -manifest example_d.exe.manifest -outputresource:example_d.exe;1
        link -nologo -debug -incremental:no -opt:ref -out:minigzip_d.exe minigzip.obj zdll.lib
        if exist minigzip_d.exe.manifest  mt -nologo -manifest minigzip_d.exe.manifest -outputresource:minigzip_d.exe;1
此时编译成功.
05 配置Qt工程
工具->选项->Kits->编译器->添加->Custom
然后我们分别添加一个C和一个C++的编译器.
添加的时候只用填写两个
添加的时候要填写名称, Compiler path, Make path.

名称可任意填写, 参考: MSVC 2022 C++ Compiler (x86) 和 MSVC 2022 C Compiler (x86)
Compiler path都设定为: C:\Program Files (x86)\Microsoft Visual Studio\2022\BuildTools\VC\Tools\MSVC\14.44.35207\bin\Hostx86\x86\cl.exe
Make path都设定为: C:\Program Files (x86)\Microsoft Visual Studio\2022\BuildTools\VC\Tools\MSVC\14.44.35207\bin\Hostx86\x86\nmake.exe
05a nmake路径查询
启动Visual Studio 2022 Developer Command Prompt , 运行where nmake
1
2
3
4
5
6
7
**********************************************************************
** Visual Studio 2022 Developer Command Prompt v17.14.19
** Copyright (c) 2025 Microsoft Corporation
**********************************************************************

C:\Program Files (x86)\Microsoft Visual Studio\2022\BuildTools>where nmake
C:\Program Files (x86)\Microsoft Visual Studio\2022\BuildTools\VC\Tools\MSVC\14.44.35207\bin\Hostx86\x86\nmake.exe
然后, 进入工具->选项->Kits->构建套件
选择编译器
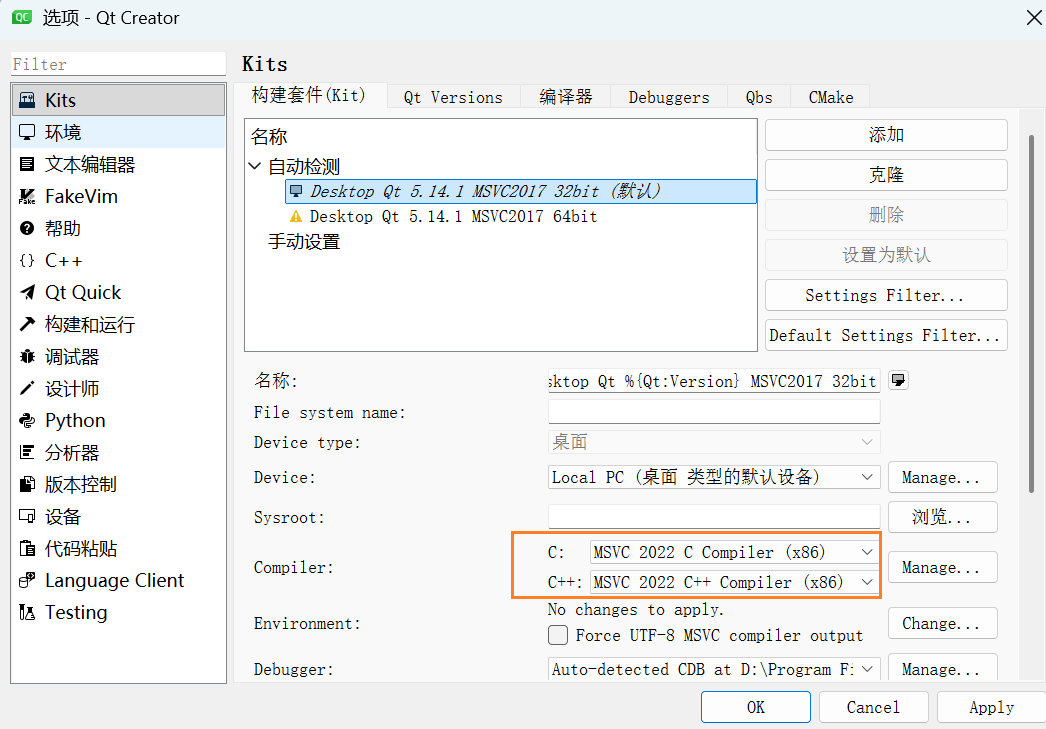
此时, 项目的设置中就可以勾选对应的kits了
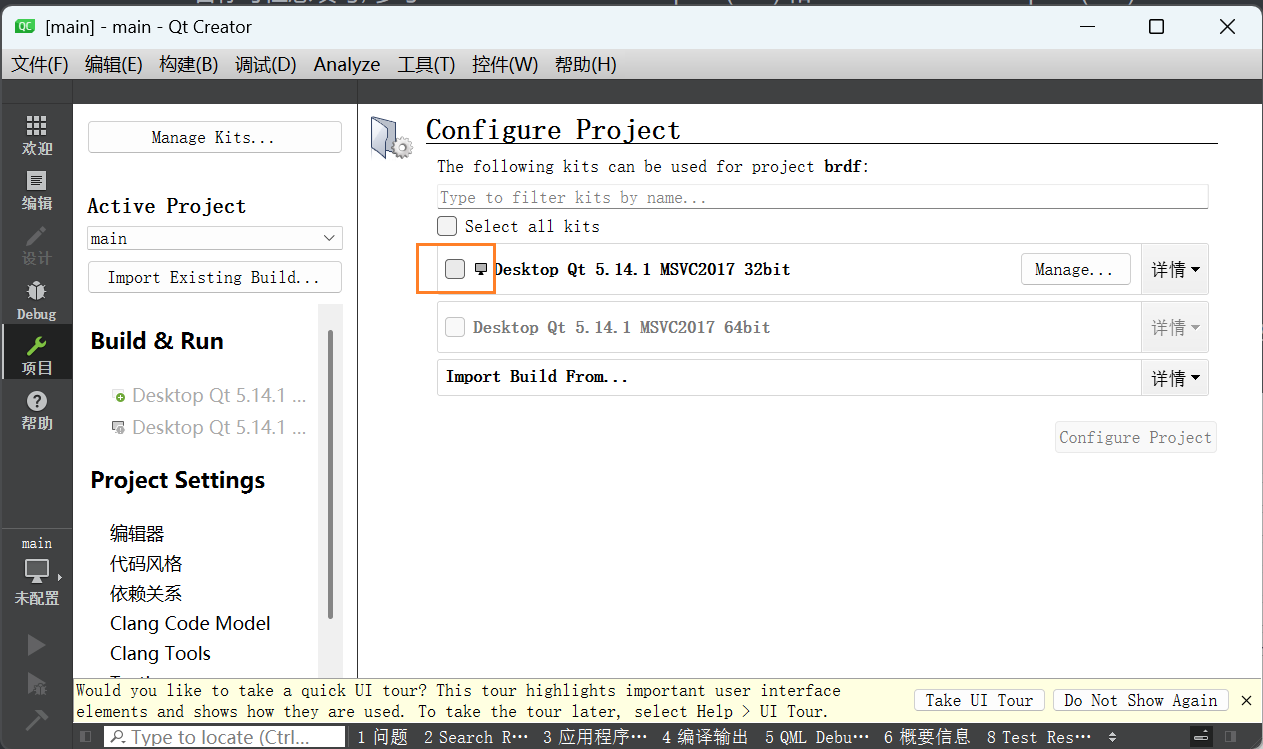
选择kits后, 右下的Configure Project按钮就可以点击了, 点击后开始编译项目. 成功后会变成如下状态:
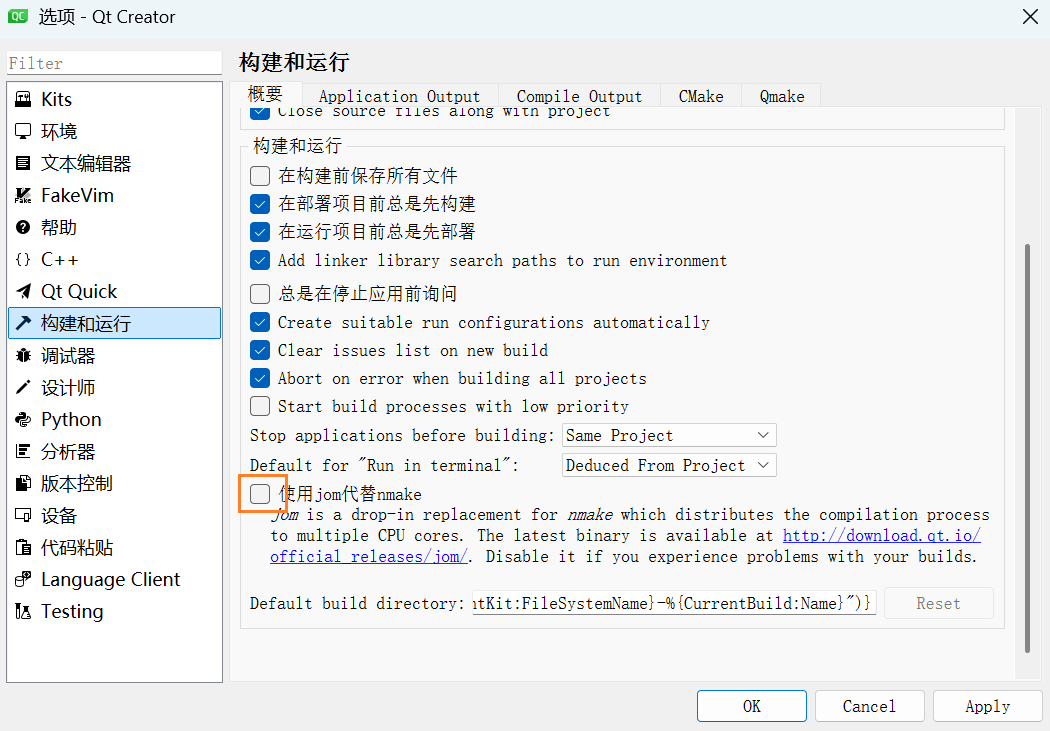
构建和运行中取消勾选使用jom代替nmake(因为brdf的工程过旧的原因)
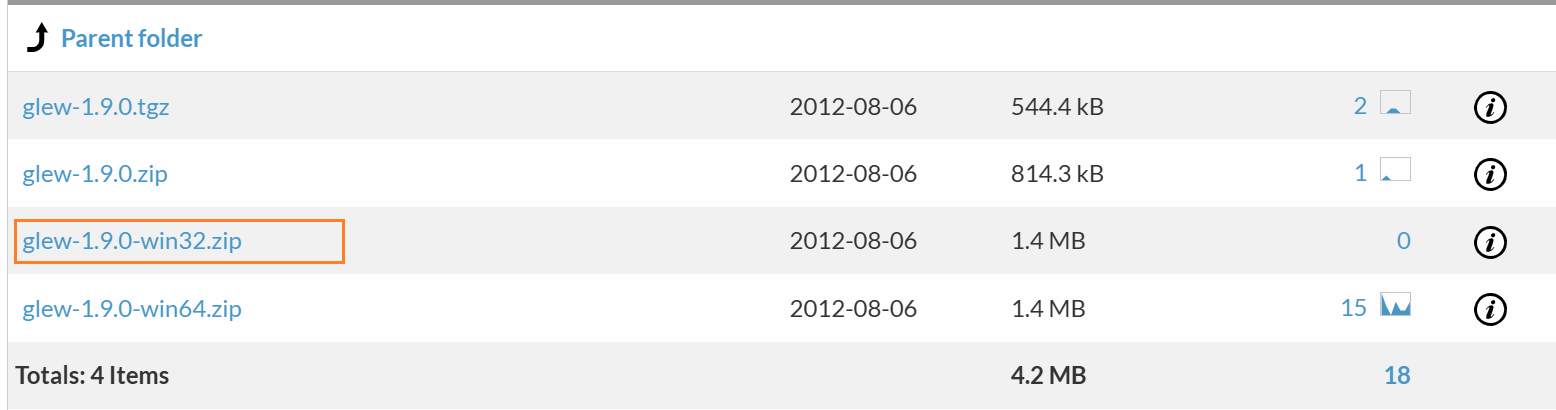
06 下载glew 1.9.0
The OpenGL Extension Wrangler Library - Browse /glew/1.9.0 at SourceForge.net
07 下载freeglut
freeglut Windows Development Libraries(注意, 下载MSVC的版本)
或者自己编译
08 配置Qt工程的Config.pri
该配置不起作用, 选择硬编码到brdf.pro文件中
内容如下, 注意, 路径要换成你自己的路径:
1
2
3
4
5
6
7
8
9
10
11
12
13
14
15
16
17
18
19
# PATH_TO_ZLIB_SOURCE
ZLIB_INCLUDE_DIR = E:\Projects\zlib
# PATH TO zlibwapi.lib (zlib 1.2.11 version)
ZLIB_LIB = E:\Projects\zlib\zlib.lib
# PATH TO zlibwapi.dll (zlib 1.2.11 version)
ZLIB_DLL = E:\Projects\zlib\zlib1.dll
# GLEW (1.9.0)
GLEW_INC = D:\Dev\App\glew-1.9.0\include
GLEW_LIB = D:\Dev\App\glew-1.9.0\lib
# GLUT (freeglut 3.0.0)
GLUT_INC = D:\Dev\App\freeglut\include\GL
GLUT_LIB = D:\Dev\App\freeglut\lib
QMAKE_MAC_SDK = macosx10.9
QMAKE_MACOSX_DEPLOYMENT_TARGET = 10.9
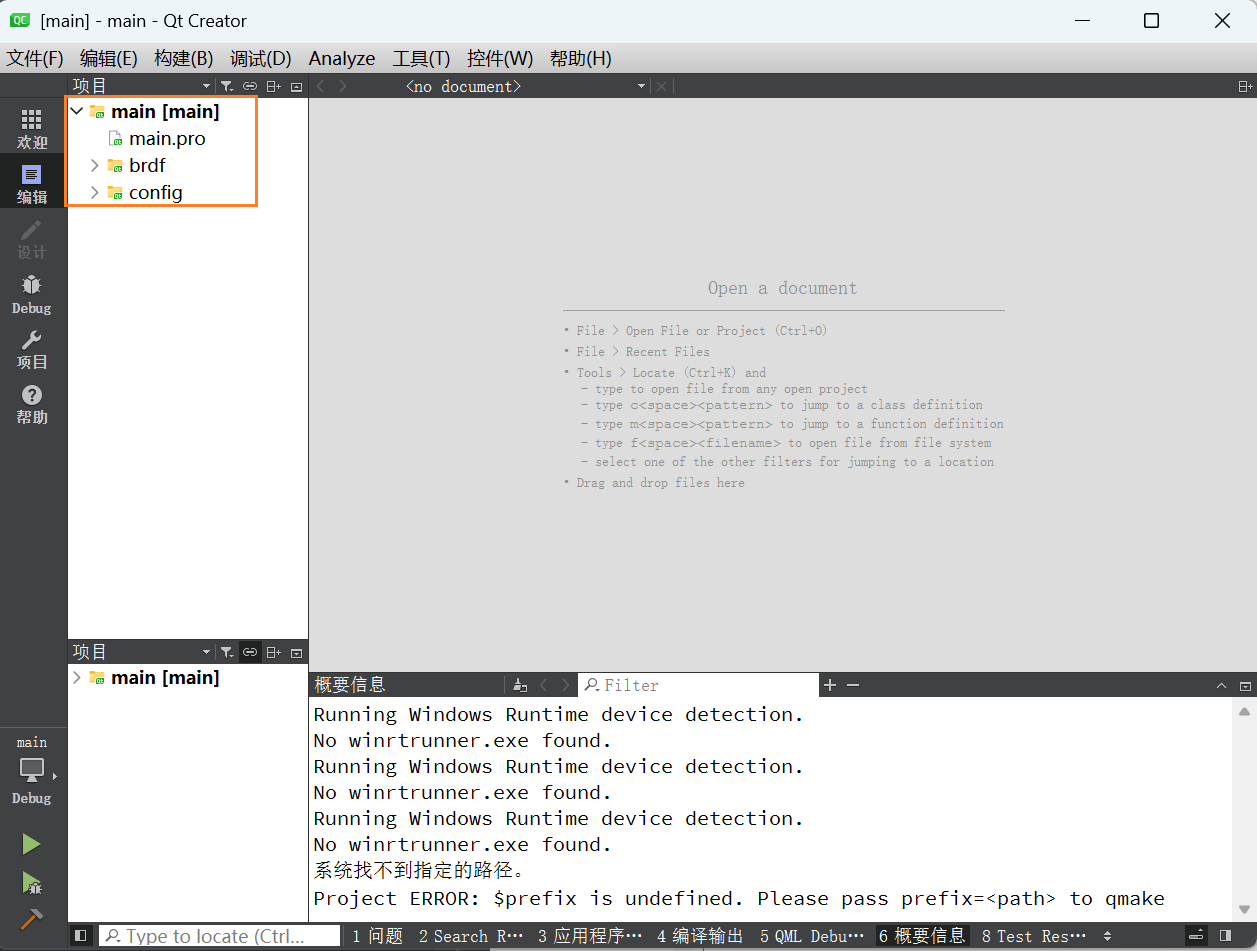
09 执行构建
这个时候直接执行构建->执行qmake会报错
1
15:47:51: 为项目main执行步骤 ... 15:47:51: 正在启动 "D:\Qt\Qt5.14.1\5.14.1\msvc2017\bin\qmake.exe" E:\Projects\brdf\main.pro "CONFIG+=debug" "CONFIG+=qml_debug" 15:47:51: 进程"D:\Qt\Qt5.14.1\5.14.1\msvc2017\bin\qmake.exe"正常退出。 15:47:51: 正在启动 "C:\Program Files (x86)\Microsoft Visual Studio\2022\BuildTools\VC\Tools\MSVC\14.44.35207\bin\Hostx86\x86\nmake.exe" -f E:/Projects/build-main-Desktop_Qt_5_14_1_MSVC2017_32bit-Debug/Makefile qmake_all Microsoft (R) 程序维护实用工具 14.44.35219.0 版 版权所有 (C) Microsoft Corporation。 保留所有权利。 cd src\brdf\ && D:\Qt\Qt5.14.1\5.14.1\msvc2017\bin\qmake.exe -o Makefile E:\Projects\brdf\src\brdf\brdf.pro "CONFIG+=debug" "CONFIG+=qml_debug" 系统找不到指定的路径。 Project ERROR: $prefix is undefined. Please pass prefix=<path> to qmake NMAKE : fatal error U1077: “cd src\brdf\ && D:\Qt\Qt5.14.1\5.14.1\msvc2017\bin\qmake.exe -o Makefile E:\Projects\brdf\src\brdf\brdf.pro "CONFIG+=debug" "CONFIG+=qml_debug"”: 返回代码“0x3” Stop. 15:47:52: 进程"C:\Program Files (x86)\Microsoft Visual Studio\2022\BuildTools\VC\Tools\MSVC\14.44.35207\bin\Hostx86\x86\nmake.exe"退出,退出代码 2 。 Error while building/deploying project main (kit: Desktop Qt 5.14.1 MSVC2017 32bit) When executing step "qmake" 15:47:52: Elapsed time: 00:00.
原因是在brdf.pro文件中, 自动获取路径的代码是linux的, windows下无法获取, 先打开brdf.pro, 修改如下:
1
2
3
4
5
6
7
8
9
10
11
12
13
14
15
16
17
18
19
20
21
22
23
24
25
26
27
28
29
30
31
32
33
TEMPLATE = app
CONFIG += qt5  #debug

# 直接写本地目录
prefix = $$PWD
# 将ZLIB_DIR和ZLIB_LIB硬编码到文件中, 路径改成自己的, 目录的写法和文件的写法要注意
ZLIB_DIR = E:\Projects\zlib
ZLIB_LIB = -LE:\Projects\zlib -lzlib

# 注释自动获取的linux用的代码
#isEmpty(prefix) {
#	prefix = $$system(pf-makevar --absolute root 2>/dev/null)
#}
#isEmpty(prefix) {
#	error("$prefix is undefined. Please pass prefix=<path> to qmake")
#}

DEST = $$prefix
isEmpty(LIBDIR) {
	LIBDIR = $$system(pf-makevar lib 2>/dev/null)
}
isEmpty(LIBDIR) {
	LIBDIR = lib
}
...
win32-msvc*{
# 这里改成变量的写法
    INCLUDEPATH += $$ZLIB_DIR
# 这里注释掉, 因为我们的zlib编译的是通常的版本, 而不是wapi版本
#    DEFINES += ZLIB_WINAPI
# 这里改成变量的写法
    LIBS += $$ZLIB_LIB
}
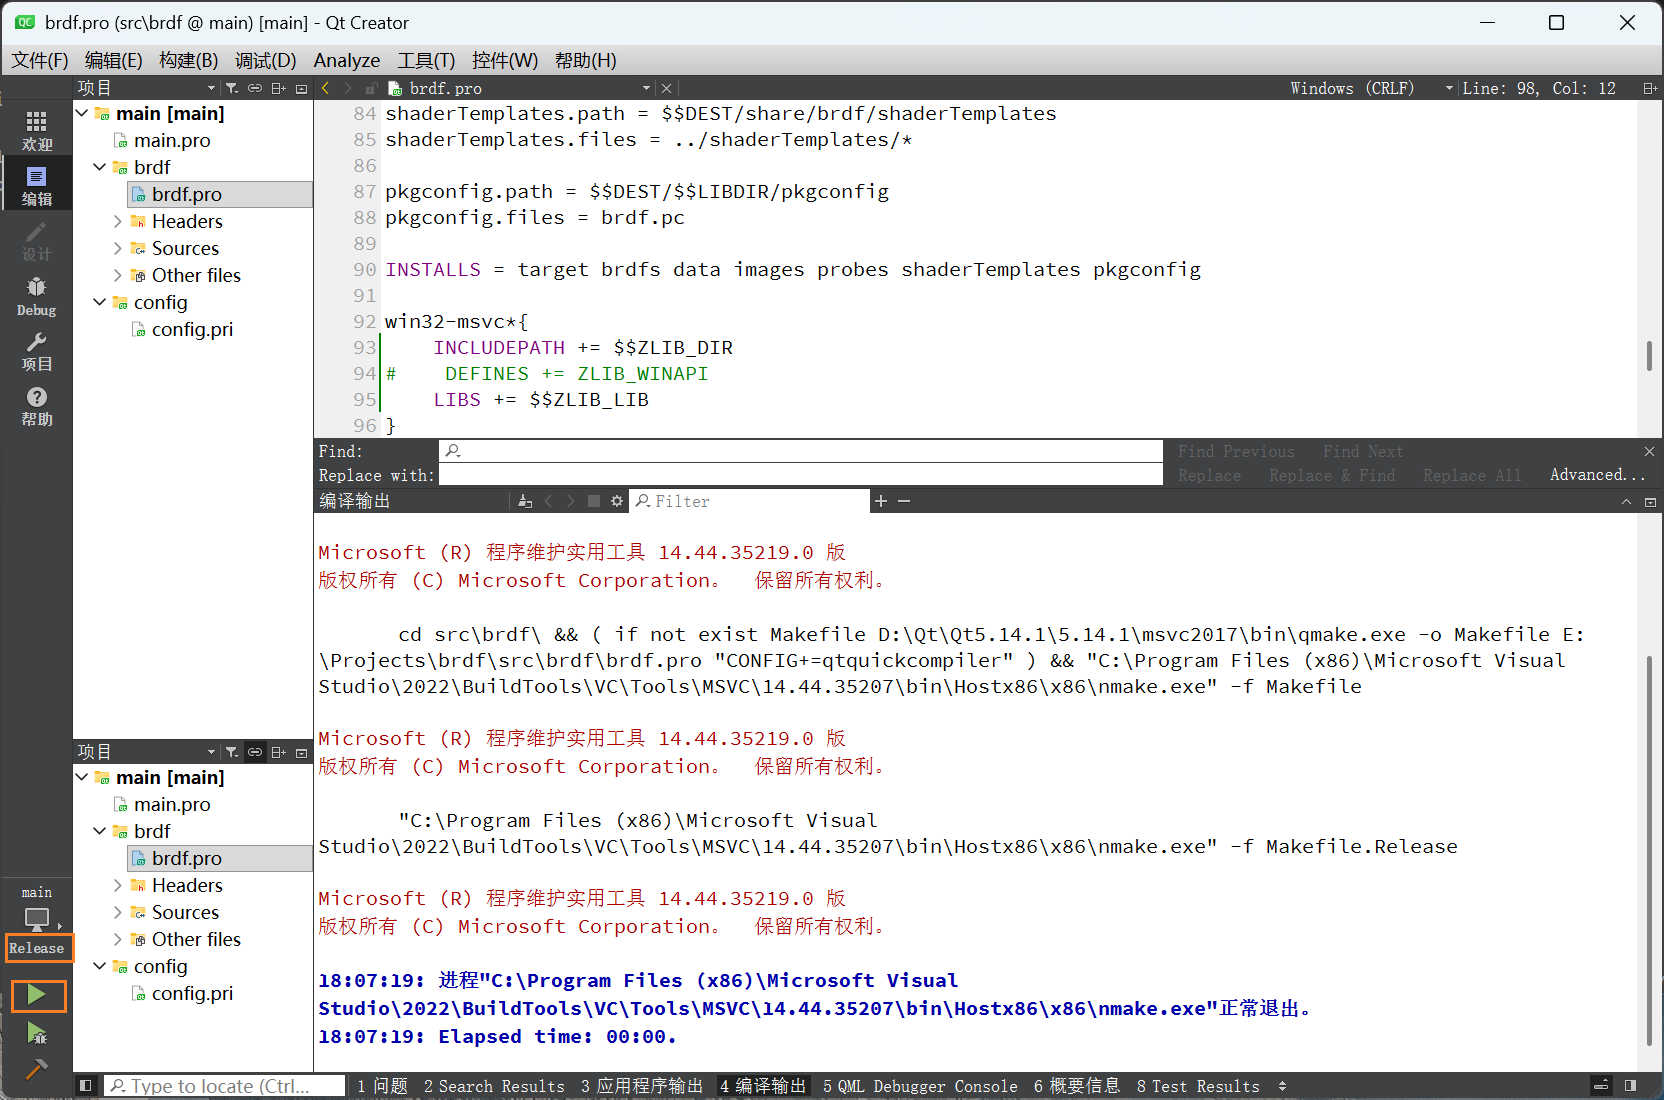
另外, 也因为zlib编译的是通常的版本, 而不是Debug版本, 所以这个工程也用Release版本, 同时, 由于nmake不接受-j24这个参数, 将原来的命名用Custom Process Step重写, 这些改动如下:
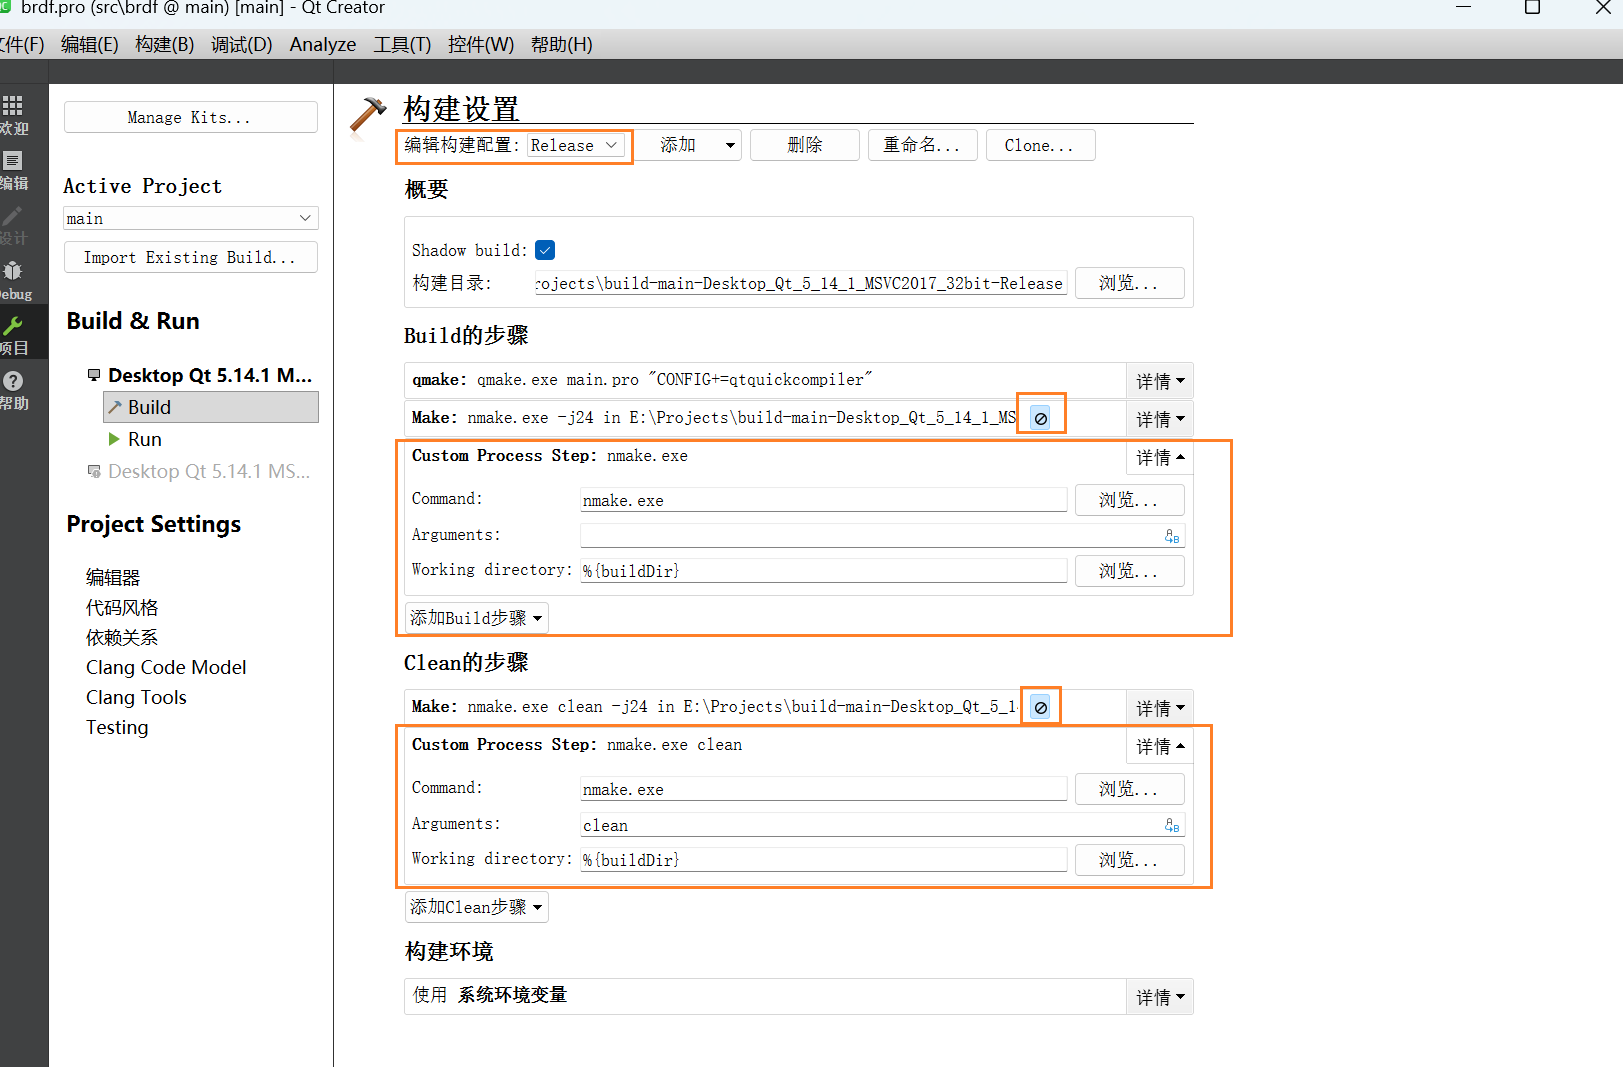
之后执行构建->构建项目"main", 即可构建成功.
10 运行
你可以在E:\Projects\build-main-Desktop_Qt_5_14_1_MSVC2017_32bit-Release\src\brdf\release目录中找到构建出来的文件.
但目前并没有构建独立运行的版本, 所以我们先通过Qt Creator来运行.
运行前, 请确认Working directory就是你输出的brdf.exe所在的目录
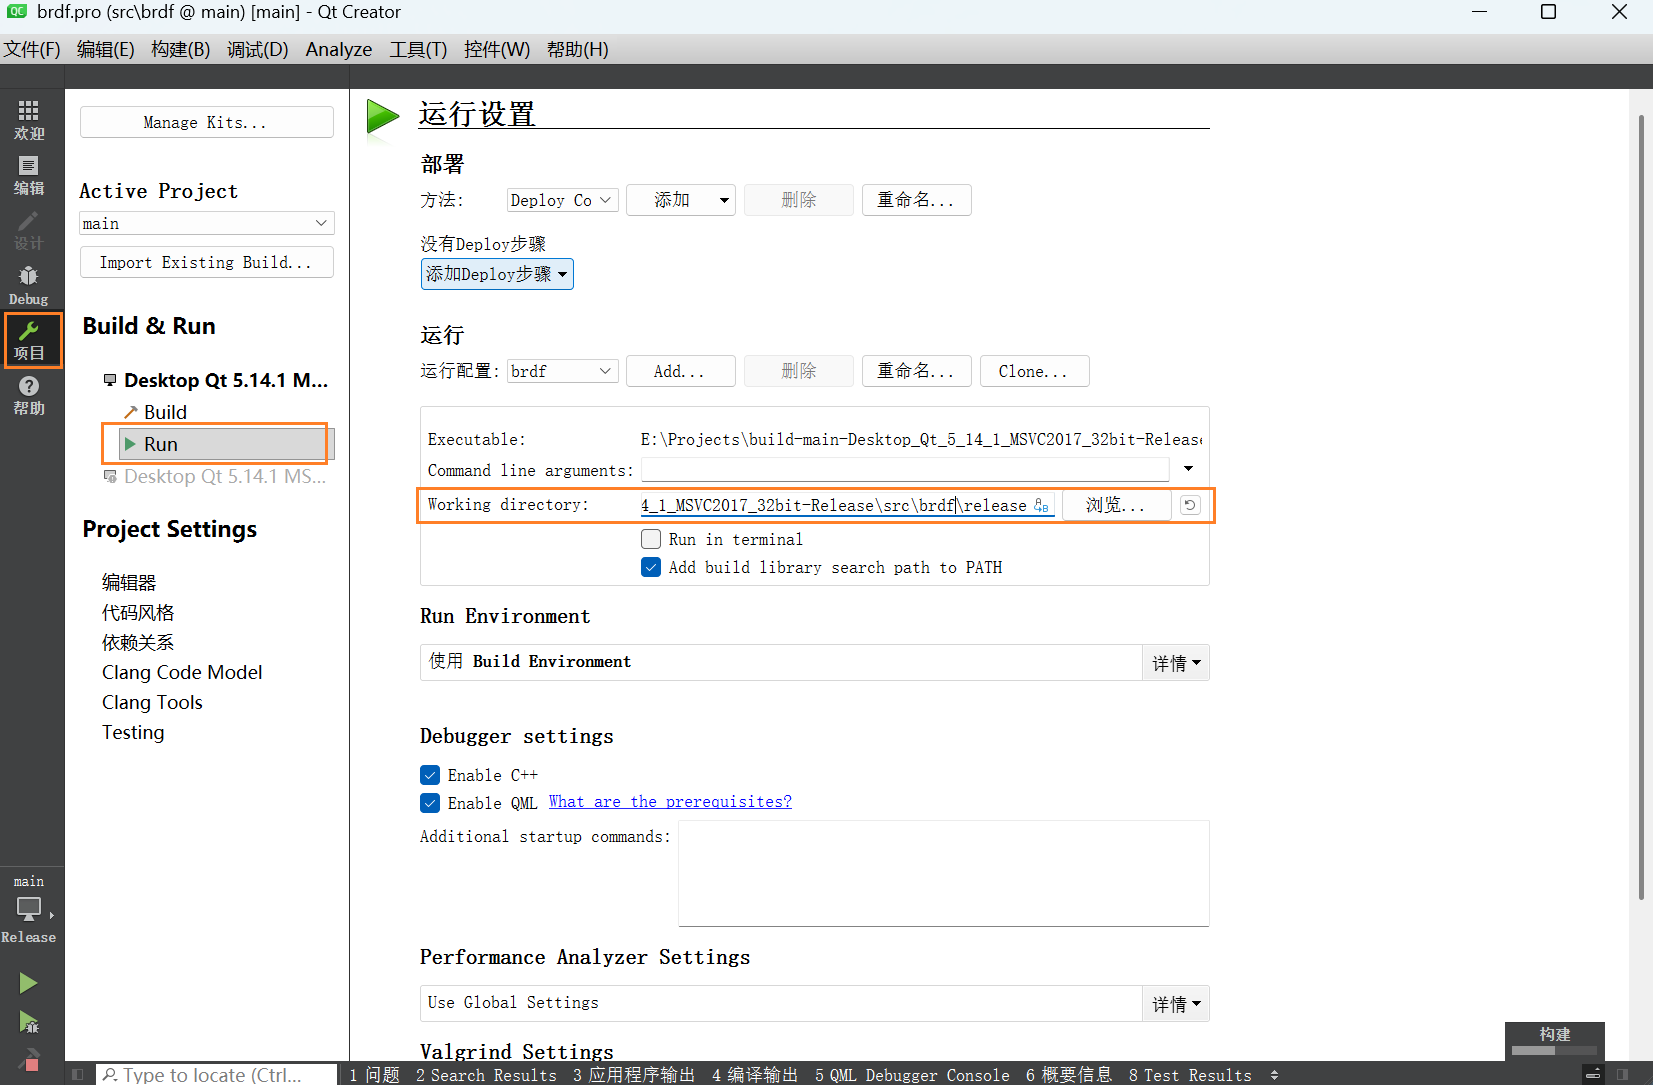
将brdf工程中的5个文件夹拷贝进去
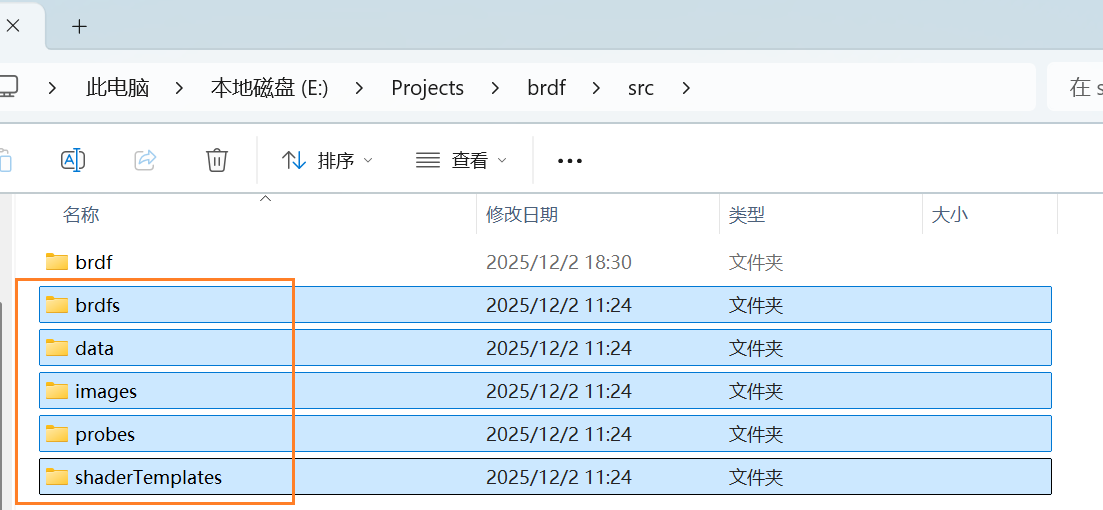
点击左下角的运行, 注意是运行Release版本.
11 构建可独立运行的版本
Windows开始菜单, 输入qt, 找到类似下方名字的应用:
1
Qt 5.14.1 (MSVC 2017 32-bit)
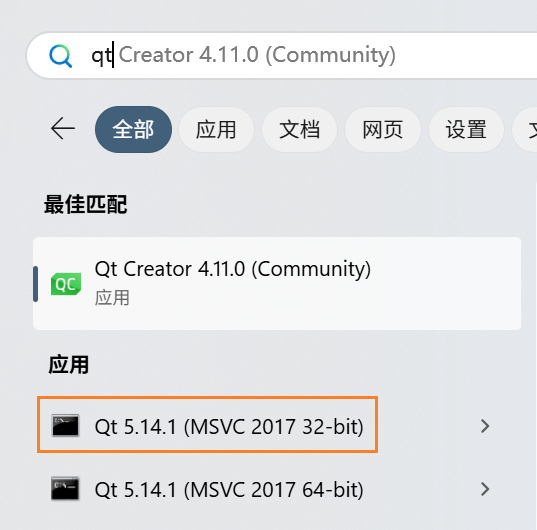
此时, 会进入一个设定好了环境变量的命令行.
进入brdf.exe所在的目录
1
cd /d E:\Projects\build-main-Desktop_Qt_5_14_1_MSVC2017_32bit-Release\src\brdf\release
利用windeployqt来进行dll收集和发布
1
windeployqt.exe brdf.exe

这样, 会在目录中补齐Qt所需要的目录和dll.
此时就可以作为独立运行软件使用了.
参考网页
- wdas/brdf: BRDF Explorer
- Index of /archive/qt/5.14/5.14.1
- koukotsu.org
- 从零开始搞起 Disney BRDF源码编译(含踩坑经历)_brdf explorer编译-CSDN博客
- Disney BRDF Explorer 使用心得 - 简书
- s2012_pbs_disney_brdf_notes_v3.pdf
- 【译】Physically Based Shading at Disney - 知乎
- Software & Data Downloads — BRDF | Mitsubishi Electric Research Laboratories
- BRDF Database - Bidirectional Reflectance Distribution Function