Blender操作个人手册
Blender操作个人手册
Blender操作个人手册
用途: 作为本项目的唯一事实来源与结论沉淀区. 后续所有讨论以此为准, 并逐步沉淀为个人 Blender 操作指南.
0. 项目约定
- 讨论范围: Blender 的操作流程, 快捷键, 菜单路径, 以及与 DCC/Unity 管线相关的常见问题.
- 记录原则:
- 已确认结论: 可以直接照做, 且在 Blender 内可复现, 并经用户确认有效.
- 待验证/假设: 尚未最终确认, 需要进一步复现或明确条件.
- 原始材料: 用户提供的截图, 文字, 链接, 或 Blender 版本/偏好设置等背景.
- 黑板更新时机: 仅在我们讨论出”最终有效方案”且用户确认后, 才写入”已确认结论”或”速查表”.
- 语言与标点: 黑板内容使用中文, 但标点使用英文标点.
- 表达规范:
- 以步骤为主, 给出菜单路径与快捷键.
- 说明适用范围(如: 对象模式/编辑模式/UV 编辑器等).
- 若与 Keymap 有关, 明确注明(用户当前使用 Industry Compatible Keymap).
1. 用户环境与偏好(原始材料)
- Keymap: Industry Compatible.
- 目标产出: 最终整理为个人 Blender 操作指南.
2. 已确认结论
- UV Editor 中可以通过输入数值倍率进行缩放: Industry Compatible Keymap 下使用
R进入 Scale, 直接键入倍率并回车确认; 支持X/Y轴向约束与简单表达式输入. - Blender 导出到 Unity 后希望拖入场景时 Rotation 为 0: Blender 导出 FBX 时勾选
Apply Transform, Unity 侧无需再依赖额外的轴向烘焙选项来消除±90°补偿旋转.
3. 待验证/假设
- (待填充)
4. 速查表(持续补充)
4.1 选择与筛选
- 循环选择, 选择之后, 按住alt, 双击, 即可循环选择, 注意选择两个或者三个, 循环的方向会改变
- 多选, 按住shit
4.2 编辑网格(建模)
- 将 Origin 沿世界 Z 下移到包围盒底面高度, 保持当前 Origin 的 X/Y 不变(不改变物体外观位置):
- 目标: 自动取”当前 Origin 的 X/Y”与”物体包围盒最低 Z”, 然后把 Origin 设置到该位置.
- 一次性脚本(直接运行):
1
2
3
4
5
6
7
8
9
10
11
12
13
14
15
16
17
18
19
20
21
22
23
24
25
26
27
28
29
30
31
32
import bpy
from mathutils import Vector

def origin_down_to_bottom_keep_xy(obj: bpy.types.Object, context: bpy.types.Context) -> None:
    if obj is None or obj.type != "MESH":
        return

    # Use evaluated bounds (includes modifiers).
    depsgraph = context.evaluated_depsgraph_get()
    obj_eval = obj.evaluated_get(depsgraph)

    origin_w = obj.matrix_world.translation
    bb_world = [obj_eval.matrix_world @ Vector(corner) for corner in obj_eval.bound_box]
    bottom_z = min(v.z for v in bb_world)

    cursor = context.scene.cursor
    old_cursor = cursor.location.copy()

    cursor.location = (origin_w.x, origin_w.y, bottom_z)

    view_layer = context.view_layer
    old_active = view_layer.objects.active
    view_layer.objects.active = obj

    bpy.ops.object.origin_set(type="ORIGIN_CURSOR", center="MEDIAN")

    view_layer.objects.active = old_active
    cursor.location = old_cursor

ctx = bpy.context
for o in ctx.selected_objects:
    origin_down_to_bottom_keep_xy(o, ctx)
- 做成工具面板(Add-on, 类似 Maya 自定义工具):
- 新建一个
.py文件(例如origin_tools.py), 写入以下 Add-on 代码. - Blender:
Edit -> Preferences -> Add-ons -> Install...选择该.py文件, 勾选启用. - 3D Viewport 按
N, 在右侧面板找到你的页签与按钮. - 建议: 启用后执行
Preferences -> Save Preferences, 确保打开其他.blend文件时也持续可用.
- 新建一个
1
2
3
4
5
6
7
8
9
10
11
12
13
14
15
16
17
18
19
20
21
22
23
24
25
26
27
28
29
30
31
32
33
34
35
36
37
38
39
40
41
42
43
44
45
46
47
48
49
50
51
52
53
54
55
56
57
58
59
60
61
62
63
64
65
66
67
68
69
70
71
72
73
74
75
bl_info = {
    "name": "Origin Tools",
    "author": "User",
    "version": (1, 0, 0),
    "blender": (3, 0, 0),
    "location": "View3D > Sidebar > Origin Tools",
    "category": "Object",
}

import bpy
from mathutils import Vector


def _origin_down_to_bottom_keep_xy(obj: bpy.types.Object, context: bpy.types.Context) -> None:
    if obj is None or obj.type != "MESH":
        return

    depsgraph = context.evaluated_depsgraph_get()
    obj_eval = obj.evaluated_get(depsgraph)

    origin_w = obj.matrix_world.translation
    bb_world = [obj_eval.matrix_world @ Vector(corner) for corner in obj_eval.bound_box]
    bottom_z = min(v.z for v in bb_world)

    cursor = context.scene.cursor
    old_cursor = cursor.location.copy()

    cursor.location = (origin_w.x, origin_w.y, bottom_z)

    view_layer = context.view_layer
    old_active = view_layer.objects.active
    view_layer.objects.active = obj

    bpy.ops.object.origin_set(type="ORIGIN_CURSOR", center="MEDIAN")

    view_layer.objects.active = old_active
    cursor.location = old_cursor


class OBJECT_OT_origin_down_to_bottom_keep_xy(bpy.types.Operator):
    bl_idname = "object.origin_down_to_bottom_keep_xy"
    bl_label = "Origin To Bottom (Keep XY)"
    bl_description = "Move origin down to mesh bottom Z, keep world X/Y unchanged"
    bl_options = {"REGISTER", "UNDO"}

    def execute(self, context: bpy.types.Context):
        for obj in context.selected_objects:
            _origin_down_to_bottom_keep_xy(obj, context)
        return {"FINISHED"}


class VIEW3D_PT_origin_tools(bpy.types.Panel):
    bl_label = "Origin Tools"
    bl_idname = "VIEW3D_PT_origin_tools"
    bl_space_type = "VIEW_3D"
    bl_region_type = "UI"
    bl_category = "Origin Tools"

    def draw(self, context: bpy.types.Context):
        layout = self.layout
        layout.operator(OBJECT_OT_origin_down_to_bottom_keep_xy.bl_idname, icon="PIVOT_CURSOR")


def register():
    bpy.utils.register_class(OBJECT_OT_origin_down_to_bottom_keep_xy)
    bpy.utils.register_class(VIEW3D_PT_origin_tools)


def unregister():
    bpy.utils.unregister_class(VIEW3D_PT_origin_tools)
    bpy.utils.unregister_class(OBJECT_OT_origin_down_to_bottom_keep_xy)


if __name__ == "__main__":
    register()
- 插件改名字要点(避免卸载重装后仍显示旧名称):
- 右侧 N 面板页签名称由
Panel.bl_category决定, 不是bl_info["name"]. - 面板标题由
Panel.bl_label决定. - 改名后建议: Disable 插件 -> 重新 Enable, 或重启 Blender; 若仍旧显示旧名称, 检查是否安装了重复版本(同名文件或残留在 scripts/addons 目录).
- 右侧 N 面板页签名称由
4.3 UV
- 以特定倍率缩放 UV(可输入数值):
- 资源组织建议: 将初始 UV 存储为
UVMap.Base; 缩放用 UV 从UVMap.Base复制生成, 并按倍率命名为UVMap.1.5等. 后续若倍率不合适, 直接重新从UVMap.Base复制并按新倍率生成对应 UV, 避免在已缩放 UV 上叠加缩放导致误差累积. - 前置条件: UV Editor 中已选中要缩放的 UV/UV 岛.
- 操作(Industry Compatible): 按
R(Scale) -> 直接输入倍率数值(如2,0.5,1.25,1/3) ->Enter确认. - 仅沿单轴缩放:
R->X或Y-> 输入倍率 ->Enter. - 备注: Default Keymap 通常使用
S执行缩放, 其余流程一致.
- 资源组织建议: 将初始 UV 存储为
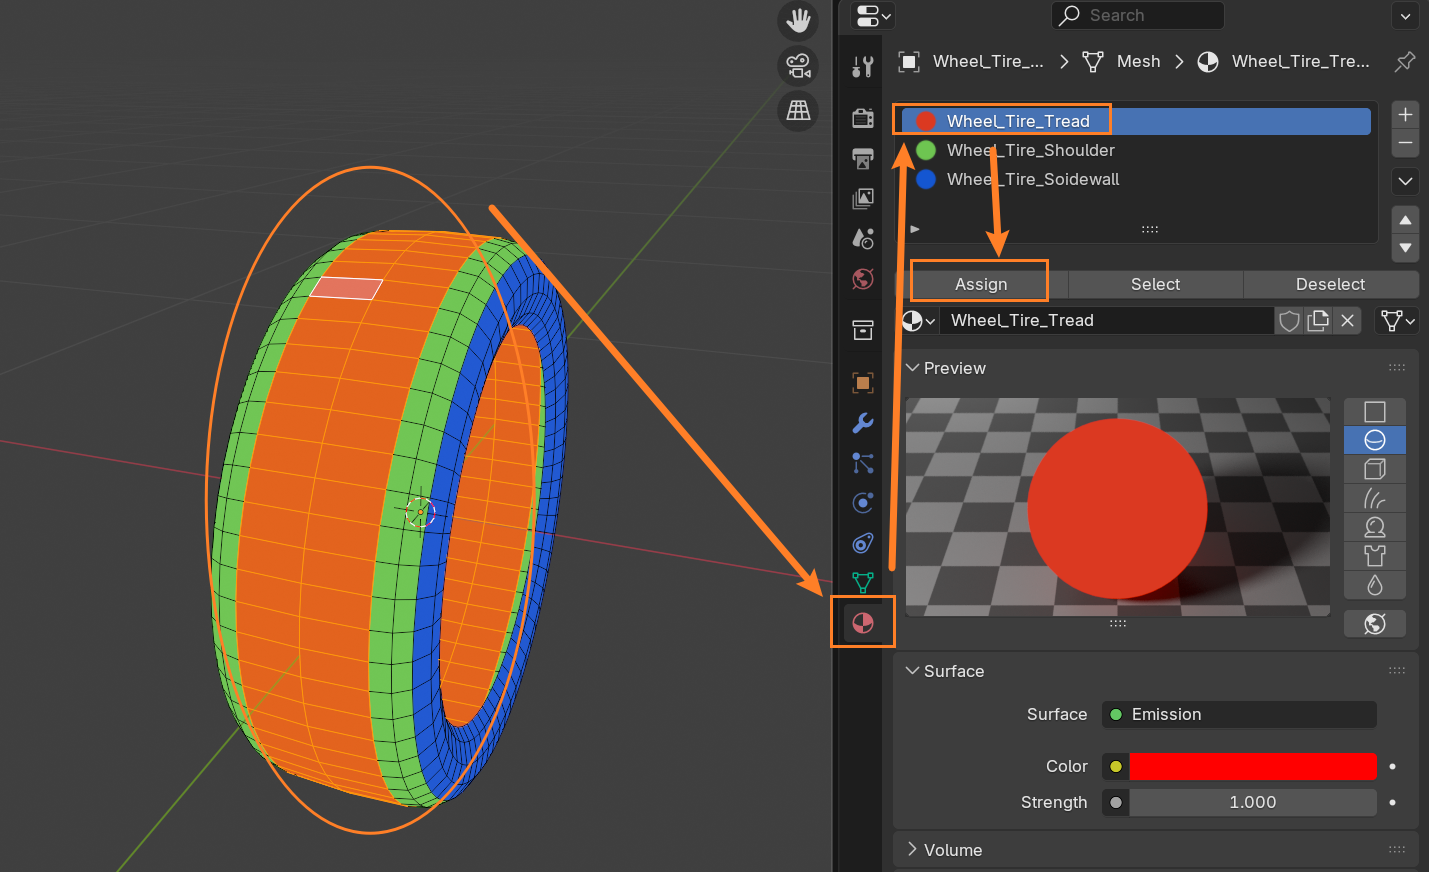
4.4 材质与贴图
- Edit模式, 面模式, 选择之后, 赋予不同的材质即可完成材质分区
4.5 导出到Unity管线
- Blender -> Unity: 若导入后拖入场景出现 Transform Rotation
X = -90°/90°等补偿值, 优先在 Blender 导出 FBX 时勾选Apply Transform, 以将轴系转换烘焙到导出数据中, 使 Unity 中实例的 Rotation 更接近 0.
4.6 根据材质球ID渲染区域图
- 用材质球分区后, 将材质选择成Emission, 渲染的时候把右上角的渲染模式选择成
MaterialPreview, 能看到结果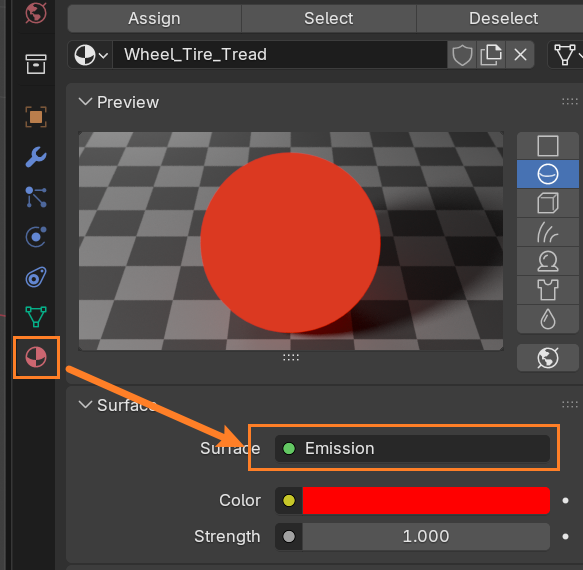
- 然后分别设置成红绿蓝三色, 这样就可以利用一张图的三个通道分成三个部分
- 切换到Shading页, 为每个材质球添加一个
ImageTexture节点, 在节点中新建一张Texture, 保持节点激活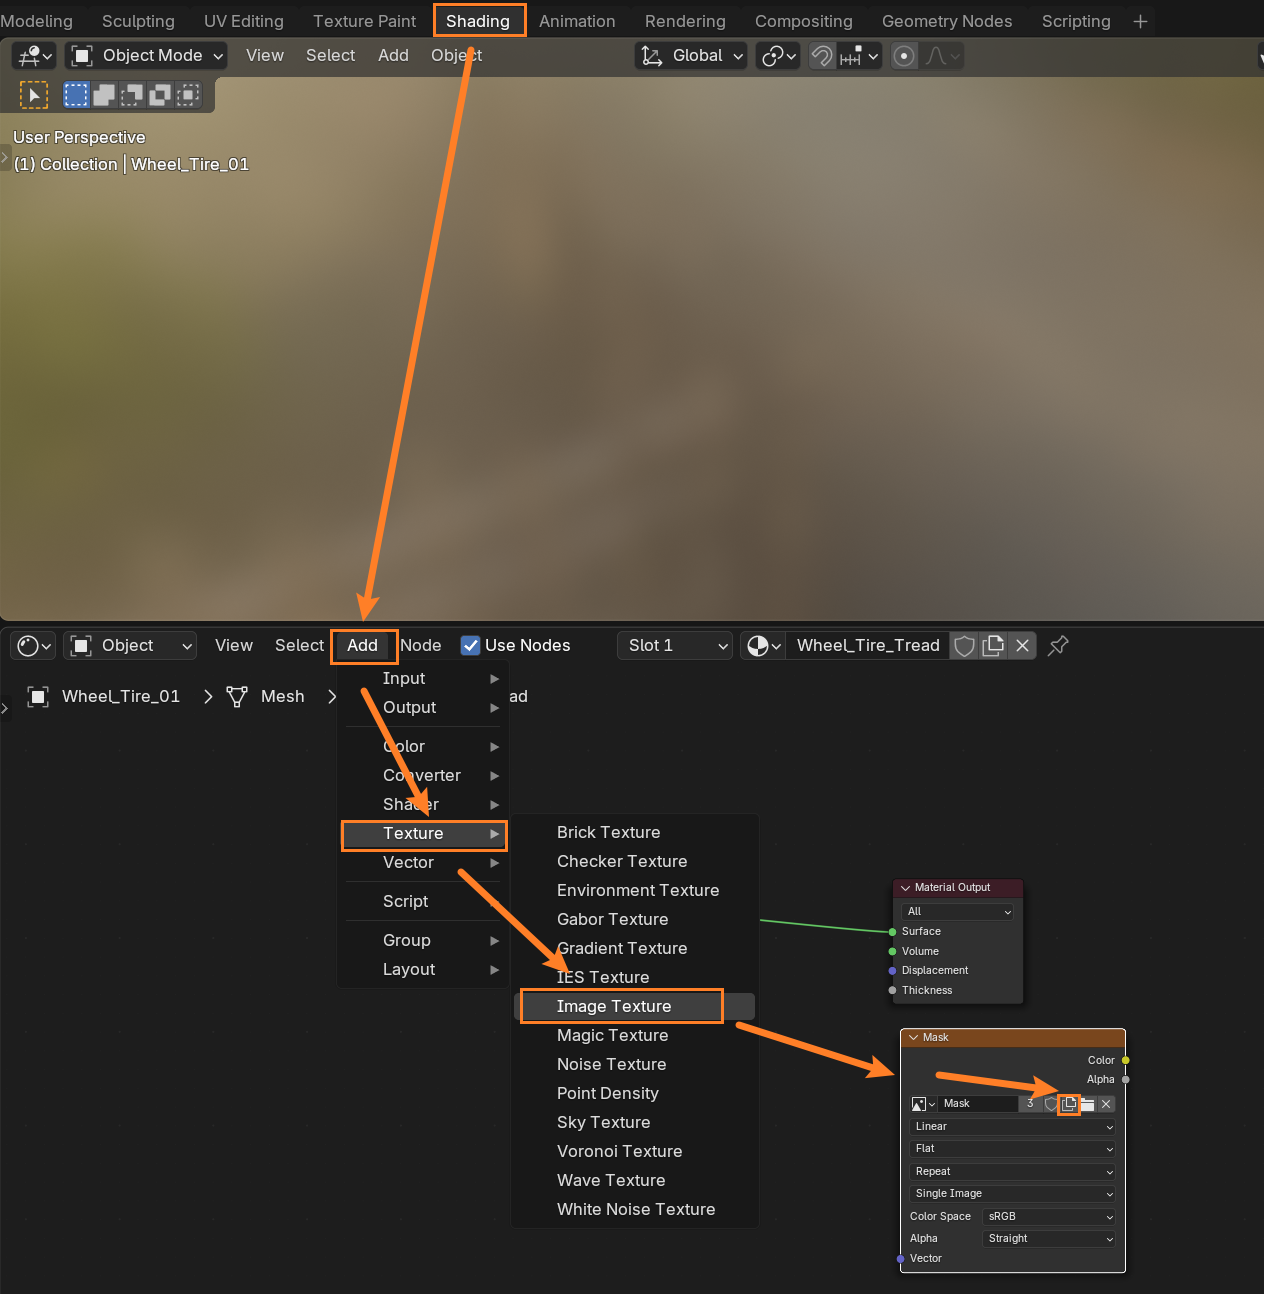
- 进入Render属性, 展开Bake, 仅渲染Emit, 勾选
ClearImage, 渲染目标选择为Image Textures, Margin定为8-16px, 最后点击Bake
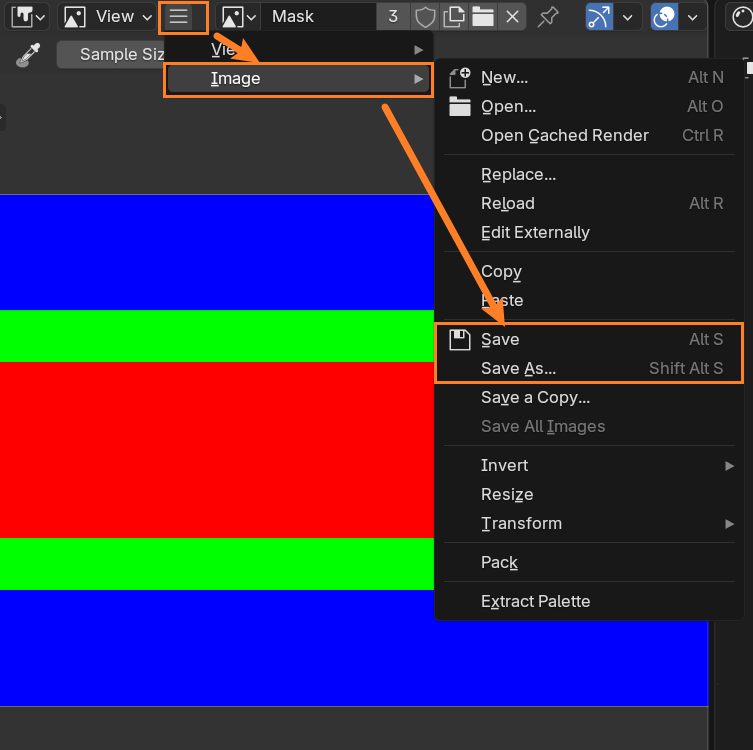
- 存储出图
4.7 删除无引用资源
可以在File->Clean Up中找到无引用的资源, 然后自动/手动删除.

5. FAQ / 常见坑
- (待填充)
6. 版本差异记录
- (待填充)
本文由作者按照 CC BY 4.0 进行授权